Thursday, October 12, 2017

How to Find Files and Folders in Linux Using the Command Line

Most people use a graphical file manager to find files in Linux, such as Nautilus in Gnome, Dolphin in KDE, and Thunar in Xfce. However, there are several ways to use the command line to find files in Linux, no matter what desktop manager you use.
01_search_in_nautilus

Using the Find Command

The “find” command allows you to search for files for which you know the approximate filenames. The simplest form of the command searches for files in the current directory and recursively through its subdirectories that match the supplied search criteria. You can search for files by name, owner, group, type, permissions, date, and other criteria.
Typing the following command at the prompt lists all files found in the current directory.
find .
The dot after “find” indicates the current directory.
02_find_dot_command
To find files that match a specific pattern, use the -name argument. You can use filename metacharacters (such as * ), but you should either put an escape character ( \ ) in front of each of them or enclose them in quotes.
For example, if we want to find all the files that start with “pro” in the Documents directory, we would use the cd Documents/ command to change to the Documents directory, and then type the following command:
find . -name pro\*
All files in the current directory starting with “pro” are listed.
NOTE: The find command defaults to being case sensitive. If you want the search for a word or phrase to be case insensitive, use the -iname option with the find command. It is the case insensitive version of the -name command.
03_find_using_name_argument
If find doesn’t locate any files matching your criteria, it produces no output.
The find command has a lot of options available for refining the search. For more information about the find command, run man find  in a Terminal window and press Enter.

Using the Locate Command

The locate command is faster than the find command because it uses a previously built database, whereas the find command searches in the real system, through all the actual directories and files. The locate command returns a list of all path names containing the specified group of characters.
The database is updated periodically from cron, but you can also update it yourself at any time so you can obtain up-to-the-minute results. To do this, type the following command at the prompt:
sudo updatedb
Enter your password when prompted.
04_updating_locate_database
The basic form of the locate command finds all the files on the file system, starting at the root, that contain all or any part of the search criteria.
locate mydata
For example, the above command found two files containing “mydata” and one file containing “data.”
05_using_basic_locate_command
If you want to find all files or directories that contain exactly and only your search criteria, use the -b option with the locate command, as follows.
locate -b ‘\mydata’
The backslash in the above command is a globbing character, which provides a way of expanding wildcard characters in a non-specific file name into a set of specific filenames. A wildcard is a symbol that can be replaced by one or more characters when the expression is evaluated. The most common wildcard symbols are the question mark ( ? ), which stands for a single character and the asterisk ( * ), which stands for a contiguous string of characters. In the above example, the backslash disables the implicit replacement of “mydata” by “*mydata*” so you end up with only results containing “mydata.”
06_locate_with_b_option
The mlocate command is a new implementation of locate. It indexes the entire file system, but the search results only include files to which the current user has access. When you update the mlocate database, it keeps timestamp information in the database. This allows mlocate to know if the contents of a directory changed without reading the contents again and makes updates to the database faster and less demanding on your hard drive.
When you install mlocate, the /usr/bin/locate binary file changes to point to mlocate. To install mlocate, if it’s not already included in your Linux distribution, type the following command at the prompt.
sudo apt-get install mlocate
NOTE: We will show you a command later in this article that allows you to determine where the executable for a command is located, if it exists.
07_installing_mlocate
The mlocate command does not use the same database file as the standard locate command. Therefore, you may want to create the database manually by typing the following command at the prompt:
sudo /etc/cron.daily/mlocate
The mlocate command will not work until the database is created either manually or when the script is run from cron.
08_creating_the_database
For more information about either the locate or the mlocate command, type man locate or man mlocate  in a Terminal window and press Enter. The same help screen displays for both commands.

Using the Which Command

The “which” command returns the absolute path of the executable that is called when a command is issued. This is useful in finding the location of an executable for creating a shortcut to the program on the desktop, on a panel, or other place in the desktop manager. For example, typing the command which firefox displays the results shown in the image below.
09_using_which_command
By default, the which command only displays the first matching executable. To display all matching executables, use the -a option with the command:
which -a firefox
You can search for multiple executables using at once, as shown in the following image. Only the paths to executables found are displayed. In the example below, only the “ps” executable was found.
10_using_which_command_multiple_programs
NOTE: The which command only searches the current user’s PATH variable. If you search for an executable that is only available for the root user as a normal user, no results will display.
For more information about the which command, type “man which” (without the quotes) at the command prompt in a Terminal window and press Enter.

Using the Whereis Command

The whereis command is used to find out where the binary, source, and man page files for a command are located. For example, typing whereis firefox at the prompt displays results as shown in the following image.
11_using_whereis_command
If you want only the path to the executable to display, and not the paths to the source and the man(ual) pages, use the -b option. For example, the command whereis -b firefox will display only /usr/bin/firefox as the result. This is handy because you will most likely search for a program’s executable file more often than you would search for source and man pages for that program. You can also search for only the source files ( -s ) or for only the man pages ( -m ).
For more information about the whereis command, type man whereis in a Terminal window and press Enter.

Understanding the Difference Between the Whereis Command and the Which Command

The whereis command shows you the location for the binary, source, and man pages for a command, whereas the which command only shows you the location of the binary for the command.
The whereis command searches through a list of specific directories for the binary, source, and man files whereas the which command searches the directories listed in the current user’s PATH environment variable. For the whereis command, the list of specific directories can be found in the FILES section of the man pages for the command.
When it comes to results displayed by default, the whereis command displays everything it finds whereas the which command only displays the first executable it finds. You can change that using the -a option, discussed earlier, for the which command.
Because the whereis command only uses paths hard-coded into the command, you may not always find what you are looking for. If you are searching for a program you think might be installed in a directory not listed in the man pages for the whereis command, you might want to use the which command with the -a option to find all occurrences of the command throughout the system.

Tuesday, October 10, 2017

10 Useful Commands to Collect System and Hardware Information in Linux

It is always a good practice to know the hardware components of your Linux system is running on, this helps you to deal with compatibility issues when it comes to installing packages, drivers on your system.
Check Hardware and System Information in Linux
10 Commands to Check Hardware and System Information in Linux
Therefore in this tips and tricks, we shall look at some useful commands that can help you to extract information about your Linux system and hardware components.

1. How to View Linux System Information

To know only system name, you can use uname command without any switch will print system information or uname -s command will print the kernel name of your system.
tecmint@tecmint ~ $ uname
Linux
To view your network hostname, use ‘-n’ switch with uname command as shown.
tecmint@tecmint ~ $ uname -n
tecmint.com
To get information about kernel-version, use ‘-v’ switch.
tecmint@tecmint ~ $ uname -v
#64-Ubuntu SMP Mon Sep 22 21:28:38 UTC 2014
To get the information about your kernel release, use ‘-r’ switch.
tecmint@tecmint ~ $ uname -r
3.13.0-37-generic
To print your machine hardware name, use ‘-m’ switch:
tecmint@tecmint ~ $ uname -m
x86_64
All this information can be printed at once by running ‘uname -a’ command as shown below.
tecmint@tecmint ~ $ uname -a
Linux tecmint.com 3.13.0-37-generic #64-Ubuntu SMP Mon Sep 22 21:28:38 UTC 2014 x86_64 x86_64 x86_64 GNU/Linux

2. How to View Linux System Hardware Information

Here you can use the lshw tool to gather vast information about your hardware components such as cpu, disks, memory, usb controllers etc.
lshw is a relatively small tool and there are few options that you can use with it while extracting information. The information provided by lshw gathered form different /proc files.
Note: Do remember that the lshw command executed by superuser (root) or sudo user.
Read Also: Difference Between su and sudo User in Linux
To print information about your Linux system hardware, run this command.
tecmint@tecmint ~ $ sudo lshw
tecmint.com               
description: Notebook
product: 20354 (LENOVO_MT_20354_BU_idea_FM_Lenovo Z50-70)
vendor: LENOVO
version: Lenovo Z50-70
serial: 1037407803441
width: 64 bits
capabilities: smbios-2.7 dmi-2.7 vsyscall32
configuration: administrator_password=disabled boot=normal chassis=notebook family=IDEAPAD frontpanel_password=disabled keyboard_password=disabled power-on_password=disabled sku=LENOVO_MT_20354_BU_idea_FM_Lenovo Z50-70 uuid=E4B1D229-D237-E411-9F6E-28D244EBBD98
*-core
description: Motherboard
product: Lancer 5A5
vendor: LENOVO
physical id: 0
version: 31900059WIN
serial: YB06377069
slot: Type2 - Board Chassis Location
*-firmware
description: BIOS
vendor: LENOVO
physical id: 0
version: 9BCN26WW
date: 07/31/2014
size: 128KiB
capacity: 4032KiB
capabilities: pci upgrade shadowing cdboot bootselect edd int13floppynec int13floppytoshiba int13floppy360 int13floppy1200 int13floppy720 int13floppy2880 int9keyboard int10video acpi usb biosbootspecification uefi
......
You can print a summary of your hardware information by using the -short option.
tecmint@tecmint ~ $ sudo lshw -short
H/W path       Device      Class          Description
=====================================================
system         20354 (LENOVO_MT_20354_BU_idea_FM_Lenovo Z50-70)
/0                         bus            Lancer 5A5
/0/0                       memory         128KiB BIOS
/0/4                       processor      Intel(R) Core(TM) i5-4210U CPU @ 1.70GHz
/0/4/b                     memory         32KiB L1 cache
/0/4/c                     memory         256KiB L2 cache
/0/4/d                     memory         3MiB L3 cache
/0/a                       memory         32KiB L1 cache
/0/12                      memory         8GiB System Memory
/0/12/0                    memory         DIMM [empty]
/0/12/1                    memory         DIMM [empty]
/0/12/2                    memory         8GiB SODIMM DDR3 Synchronous 1600 MHz (0.6 ns)
/0/12/3                    memory         DIMM [empty]
/0/100                     bridge         Haswell-ULT DRAM Controller
/0/100/2                   display        Haswell-ULT Integrated Graphics Controller
/0/100/3                   multimedia     Haswell-ULT HD Audio Controller
...
If you wish to generate output as a html file, you can use the option -html.
tecmint@tecmint ~ $ sudo lshw -html > lshw.html
Generate Linux Hardware Information in HTML

3. How to View Linux CPU Information

To view information about your CPU, use the lscpu command as it shows information about your CPU architecture such as number of CPU’s, cores, CPU family model, CPU caches, threads, etc from sysfs and /proc/cpuinfo.
tecmint@tecmint ~ $ lscpu
Architecture:          x86_64
CPU op-mode(s):        32-bit, 64-bit
Byte Order:            Little Endian
CPU(s):                4
On-line CPU(s) list:   0-3
Thread(s) per core:    2
Core(s) per socket:    2
Socket(s):             1
NUMA node(s):          1
Vendor ID:             GenuineIntel
CPU family:            6
Model:                 69
Stepping:              1
CPU MHz:               768.000
BogoMIPS:              4788.72
Virtualization:        VT-x
L1d cache:             32K
L1i cache:             32K
L2 cache:              256K
L3 cache:              3072K
NUMA node0 CPU(s):     0-3

4. How to Collect Linux Block Device Information

Block devices are storage devices such as hard disks, flash drives etc. lsblk command is used to report information about block devices as follows.
tecmint@tecmint ~ $ lsblk
NAME    MAJ:MIN RM   SIZE RO TYPE MOUNTPOINT
sda       8:0    0 931.5G  0 disk 
├─sda1    8:1    0  1000M  0 part 
├─sda2    8:2    0   260M  0 part /boot/efi
├─sda3    8:3    0  1000M  0 part 
├─sda4    8:4    0   128M  0 part 
├─sda5    8:5    0 557.1G  0 part 
├─sda6    8:6    0    25G  0 part 
├─sda7    8:7    0  14.7G  0 part 
├─sda8    8:8    0     1M  0 part 
├─sda9    8:9    0 324.5G  0 part /
└─sda10   8:10   0   7.9G  0 part [SWAP]
sr0      11:0    1  1024M  0 rom  
If you want to view all block devices on your system then include the -a option.
tecmint@tecmint ~ $ lsblk -a
NAME    MAJ:MIN RM   SIZE RO TYPE MOUNTPOINT
sda       8:0    0 931.5G  0 disk 
├─sda1    8:1    0  1000M  0 part 
├─sda2    8:2    0   260M  0 part /boot/efi
├─sda3    8:3    0  1000M  0 part 
├─sda4    8:4    0   128M  0 part 
├─sda5    8:5    0 557.1G  0 part 
├─sda6    8:6    0    25G  0 part 
├─sda7    8:7    0  14.7G  0 part 
├─sda8    8:8    0     1M  0 part 
├─sda9    8:9    0 324.5G  0 part /
└─sda10   8:10   0   7.9G  0 part [SWAP]
sdb       8:16   1         0 disk 
sr0      11:0    1  1024M  0 rom  
ram0      1:0    0    64M  0 disk 
ram1      1:1    0    64M  0 disk 
ram2      1:2    0    64M  0 disk 
ram3      1:3    0    64M  0 disk 
ram4      1:4    0    64M  0 disk 
ram5      1:5    0    64M  0 disk 
ram6      1:6    0    64M  0 disk 
ram7      1:7    0    64M  0 disk 
ram8      1:8    0    64M  0 disk 
ram9      1:9    0    64M  0 disk 
loop0     7:0    0         0 loop 
loop1     7:1    0         0 loop 
loop2     7:2    0         0 loop 
loop3     7:3    0         0 loop 
loop4     7:4    0         0 loop 
loop5     7:5    0         0 loop 
loop6     7:6    0         0 loop 
loop7     7:7    0         0 loop 
ram10     1:10   0    64M  0 disk 
ram11     1:11   0    64M  0 disk 
ram12     1:12   0    64M  0 disk 
ram13     1:13   0    64M  0 disk 
ram14     1:14   0    64M  0 disk 
ram15     1:15   0    64M  0 disk 

5. How to Print USB Controllers Information

The lsusb command is used to report information about USB controllers and all the devices that are connected to them.
tecmint@tecmint ~ $ lsusb
Bus 001 Device 002: ID 8087:8000 Intel Corp. 
Bus 001 Device 001: ID 1d6b:0002 Linux Foundation 2.0 root hub
Bus 003 Device 001: ID 1d6b:0003 Linux Foundation 3.0 root hub
Bus 002 Device 005: ID 0bda:b728 Realtek Semiconductor Corp. 
Bus 002 Device 004: ID 5986:0249 Acer, Inc 
Bus 002 Device 003: ID 0bda:0129 Realtek Semiconductor Corp. RTS5129 Card Reader Controller
Bus 002 Device 002: ID 045e:00cb Microsoft Corp. Basic Optical Mouse v2.0
Bus 002 Device 001: ID 1d6b:0002 Linux Foundation 2.0 root hub
You can use the -v option to generate a detailed information about each USB device.
tecmint@tecmint ~ $ lsusb -v

6. How to Print PCI Devices Information

PCI devices may included usb ports, graphics cards, network adapters etc. The lspci tool is used to generate information concerning all PCI controllers on your system plus the devices that are connected to them.
To print information about PCI devices run the following command.
tecmint@tecmint ~ $ lspci
00:00.0 Host bridge: Intel Corporation Haswell-ULT DRAM Controller (rev 0b)
00:02.0 VGA compatible controller: Intel Corporation Haswell-ULT Integrated Graphics Controller (rev 0b)
00:03.0 Audio device: Intel Corporation Haswell-ULT HD Audio Controller (rev 0b)
00:14.0 USB controller: Intel Corporation Lynx Point-LP USB xHCI HC (rev 04)
00:16.0 Communication controller: Intel Corporation Lynx Point-LP HECI #0 (rev 04)
00:1b.0 Audio device: Intel Corporation Lynx Point-LP HD Audio Controller (rev 04)
00:1c.0 PCI bridge: Intel Corporation Lynx Point-LP PCI Express Root Port 3 (rev e4)
00:1c.3 PCI bridge: Intel Corporation Lynx Point-LP PCI Express Root Port 4 (rev e4)
00:1c.4 PCI bridge: Intel Corporation Lynx Point-LP PCI Express Root Port 5 (rev e4)
00:1d.0 USB controller: Intel Corporation Lynx Point-LP USB EHCI #1 (rev 04)
00:1f.0 ISA bridge: Intel Corporation Lynx Point-LP LPC Controller (rev 04)
00:1f.2 SATA controller: Intel Corporation Lynx Point-LP SATA Controller 1 [AHCI mode] (rev 04)
00:1f.3 SMBus: Intel Corporation Lynx Point-LP SMBus Controller (rev 04)
01:00.0 Ethernet controller: Realtek Semiconductor Co., Ltd. RTL8111/8168/8411 PCI Express Gigabit Ethernet Controller (rev 10)
02:00.0 Network controller: Realtek Semiconductor Co., Ltd. RTL8723BE PCIe Wireless Network Adapter
03:00.0 3D controller: NVIDIA Corporation GM108M [GeForce 840M] (rev a2)
Use the -t option to produce output in a tree format.
tecmint@tecmint ~ $ lspci -t
-[0000:00]-+-00.0
+-02.0
+-03.0
+-14.0
+-16.0
+-1b.0
+-1c.0-[01]----00.0
+-1c.3-[02]----00.0
+-1c.4-[03]----00.0
+-1d.0
+-1f.0
+-1f.2
\-1f.3
Use the -v option to produce detailed information about each connected device.
tecmint@tecmint ~ $ lspci -v
00:00.0 Host bridge: Intel Corporation Haswell-ULT DRAM Controller (rev 0b)
Subsystem: Lenovo Device 3978
Flags: bus master, fast devsel, latency 0
Capabilities: 
00:02.0 VGA compatible controller: Intel Corporation Haswell-ULT Integrated Graphics Controller (rev 0b) (prog-if 00 [VGA controller])
Subsystem: Lenovo Device 380d
Flags: bus master, fast devsel, latency 0, IRQ 62
Memory at c3000000 (64-bit, non-prefetchable) [size=4M]
Memory at d0000000 (64-bit, prefetchable) [size=256M]
I/O ports at 6000 [size=64]
Expansion ROM at  [disabled]
Capabilities: 
Kernel driver in use: i915
.....

7. How to Print SCSI Devices Information

To view all your scsi/sata devices, use the lsscsi command as follows. If you do not have lsscsi tool installed, run the following command to install it.
$ sudo apt-get install lsscsi        [on Debian derivatives]
# yum install lsscsi                 [On RedHat based systems]
# dnf install lsscsi                 [On Fedora 21+ Onwards]
After install, run the lsscsi command as shown:
tecmint@tecmint ~ $ lsscsi
[0:0:0:0]    disk    ATA      ST1000LM024 HN-M 2BA3  /dev/sda 
[1:0:0:0]    cd/dvd  PLDS     DVD-RW DA8A5SH   RL61  /dev/sr0 
[4:0:0:0]    disk    Generic- xD/SD/M.S.       1.00  /dev/sdb 
Use the -s option to show device sizes.
tecmint@tecmint ~ $ lsscsi -s
[0:0:0:0]    disk    ATA      ST1000LM024 HN-M 2BA3  /dev/sda   1.00TB
[1:0:0:0]    cd/dvd  PLDS     DVD-RW DA8A5SH   RL61  /dev/sr0        -
[4:0:0:0]    disk    Generic- xD/SD/M.S.       1.00  /dev/sdb        -

8. How to Print Information about SATA Devices

You can find some information about sata devices on your system as follows using the hdparm utility. In the example below, I used the block device /dev/sda1 which the harddisk on my system.
tecmint@tecmint ~ $ sudo hdparm /dev/sda1
/dev/sda1:
multcount     =  0 (off)
IO_support    =  1 (32-bit)
readonly      =  0 (off)
readahead     = 256 (on)
geometry      = 56065/255/63, sectors = 2048000, start = 2048
To print information about device geometry interms of cylinders, heads, sectors, size and the starting offset of the device, use the -g option.
tecmint@tecmint ~ $ sudo hdparm -g /dev/sda1
/dev/sda1:
geometry      = 56065/255/63, sectors = 2048000, start = 2048

9. How to Print Linux File System Information

To gather information about file system partitions, you can use fdisk command. Although the main functionality of fdisk command is to modify file system partitions, it can also be used to view information about the different partitions on your file system.
You can print partition information as follows. Remember to run the command as a superuser or else you may not see any output.
tecmint@tecmint ~ $ sudo fdisk -l
WARNING: GPT (GUID Partition Table) detected on '/dev/sda'! The util fdisk doesn't support GPT. Use GNU Parted.
Disk /dev/sda: 1000.2 GB, 1000204886016 bytes
255 heads, 63 sectors/track, 121601 cylinders, total 1953525168 sectors
Units = sectors of 1 * 512 = 512 bytes
Sector size (logical/physical): 512 bytes / 4096 bytes
I/O size (minimum/optimal): 4096 bytes / 4096 bytes
Disk identifier: 0xcee8ad92
Device Boot      Start         End      Blocks   Id  System
/dev/sda1               1  1953525167   976762583+  ee  GPT
Partition 1 does not start on physical sector boundary.

10. How to Extract Information about Hardware Components

You can also use the dmidecode utility to extract hardware information by reading data from the DMI tables.
To print information about memory, run this command as a superuser.
tecmint@tecmint ~ $ sudo dmidecode -t memory
# dmidecode 2.12
# SMBIOS entry point at 0xaaebef98
SMBIOS 2.7 present.
Handle 0x0005, DMI type 5, 24 bytes
Memory Controller Information
Error Detecting Method: None
Error Correcting Capabilities:
None
Supported Interleave: One-way Interleave
Current Interleave: One-way Interleave
Maximum Memory Module Size: 8192 MB
Maximum Total Memory Size: 32768 MB
Supported Speeds:
Other
Supported Memory Types:
Other
Memory Module Voltage: Unknown
Associated Memory Slots: 4
0x0006
0x0007
0x0008
0x0009
Enabled Error Correcting Capabilities:
None
...
To print information about system, run this command.
tecmint@tecmint ~ $ sudo dmidecode -t system
# dmidecode 2.12
# SMBIOS entry point at 0xaaebef98
SMBIOS 2.7 present.
Handle 0x0001, DMI type 1, 27 bytes
System Information
Manufacturer: LENOVO
Product Name: 20354
Version: Lenovo Z50-70
Serial Number: 1037407803441
UUID: 29D2B1E4-37D2-11E4-9F6E-28D244EBBD98
Wake-up Type: Power Switch
SKU Number: LENOVO_MT_20354_BU_idea_FM_Lenovo Z50-70
Family: IDEAPAD
...
To print information about BIOS, run this command.
tecmint@tecmint ~ $ sudo dmidecode -t bios
# dmidecode 2.12
# SMBIOS entry point at 0xaaebef98
SMBIOS 2.7 present.
Handle 0x0000, DMI type 0, 24 bytes
BIOS Information
Vendor: LENOVO
Version: 9BCN26WW
Release Date: 07/31/2014
Address: 0xE0000
Runtime Size: 128 kB
ROM Size: 4096 kB
Characteristics:
PCI is supported
BIOS is upgradeable
BIOS shadowing is allowed
Boot from CD is supported
Selectable boot is supported
EDD is supported
Japanese floppy for NEC 9800 1.2 MB is supported (int 13h)
Japanese floppy for Toshiba 1.2 MB is supported (int 13h)
5.25"/360 kB floppy services are supported (int 13h)
5.25"/1.2 MB floppy services are supported (int 13h)
3.5"/720 kB floppy services are supported (int 13h)
3.5"/2.88 MB floppy services are supported (int 13h)
8042 keyboard services are supported (int 9h)
CGA/mono video services are supported (int 10h)
ACPI is supported
USB legacy is supported
BIOS boot specification is supported
Targeted content distribution is supported
UEFI is supported
BIOS Revision: 0.26
Firmware Revision: 0.26
...
To print information about processor, run this command.
tecmint@tecmint ~ $ sudo dmidecode -t processor
# dmidecode 2.12
# SMBIOS entry point at 0xaaebef98
SMBIOS 2.7 present.
Handle 0x0004, DMI type 4, 42 bytes
Processor Information
Socket Designation: U3E1
Type: Central Processor
Family: Core i5
Manufacturer: Intel(R) Corporation
ID: 51 06 04 00 FF FB EB BF
Signature: Type 0, Family 6, Model 69, Stepping 1
Flags:
...

Summary

There are many other ways you can use to obtain information about your system hardware components. Most of these commands use files in the /proc directory to extract system information.
Hope you find this tips and tricks useful and remember to post a comment in case you want to add more information to this or if you face any difficulties in using any of the commands. Remember to always stay connected to Tecmint.

7 Chmod Command Examples for Beginners

Earlier we discussed about how to use octal permission bits with chmod. In this article, let us review how to use symbolic representation with chmod.

Following are the symbolic representation of three different roles:
  • u is for user,
  • g is for group,
  • and o is for others.
Following are the symbolic representation of three different permissions:
  • r is for read permission,
  • w is for write permission,
  • x is for execute permission.
Following are few examples on how to use the symbolic representation on chmod.

1. Add single permission to a file/directory

Changing permission to a single set. + symbol means adding permission. For example, do the following to give execute permission for the user irrespective of anything else:
$ chmod u+x filename

2. Add multiple permission to a file/directory

Use comma to separate the multiple permission sets as shown below.
$ chmod u+r,g+x filename

3. Remove permission from a file/directory

Following example removes read and write permission for the user.
$ chmod u-rx filename

4. Change permission for all roles on a file/directory

Following example assigns execute privilege to user, group and others (basically anybody can execute this file).
$ chmod a+x filename

5. Make permission for a file same as another file (using reference)

If you want to change a file permission same as another file, use the reference option as shown below. In this example, file2’s permission will be set exactly same as file1’s permission.
$ chmod --reference=file1 file2

6. Apply the permission to all the files under a directory recursively

Use option -R to change the permission recursively as shown below.
$ chmod -R 755 directory-name/

7. Change execute permission only on the directories (files are not affected)

On a particular directory if you have multiple sub-directories and files, the following command will assign execute permission only to all the sub-directories in the current directory (not the files in the current directory).
$ chmod u+X *
Note: If the files has execute permission already for either the group or others, the above command will assign the execute permission to the user

Chmod

Check the -R option
chmod -R <permissionsettings> <dirname>
In the future, you can save a lot of time by checking the man page first:
man <command name>
So in this case:
man chmod

Linux cp command

Updated: 04/26/2017 by Computer Hope

Description

The cp command is used to make copies of files and directories.

cp syntax

cp [OPTION]... [-T] SOURCE DEST
cp [OPTION]... SOURCE... DIRECTORY
cp [OPTION]... -t DIRECTORY SOURCE...

cp quick examples

Make a copy of a file into the same directory:
cp origfile newfile
Creates a copy of the file in the working directory named origfile. The copy will be named newfile, and will be located in the working directory.
CAREFUL! If the destination file newfile already exists, it will be overwritten without a confirmation prompt. This is the default behavior for all cp operations.
If you want to be prompted before overwriting a file, use the -i (interactive) option. For example:
cp -i oldfile newfile
If newfile already exists, you will be prompted:
cp: overwrite ‘newfile’?
If you type y (or yes, Y, YES, or any other combination of upper and lowercase of these), then newfile will be overwritten with a copy of origfile. Typing anything else will abort the operation.
Copy a file into another directory:
cp origfile /directory/subdirectory
Creates a copy of the file in the working directory named origfile. The copy will be located in the directory /directory/subdirectory, and will be named origfile.
cp origfile /directory/subdirectory/.
Same as the above command. The slash-dot (/.) is implied in the above form of the command. (The dot is a special file in every Linux directory which means "this directory.")
Copy a file into another directory, and give it a new name:
cp origfile /directory/subdirectory/newfile
Creates a copy of the file in the working directory named origfile. The copy will be named newfile, and will be located in the directory /directory/subdirectory.
Copy multiple files into another directory, using a wildcard:
cp file* /directory/subdirectory
Copy every file in the working directory whose name begins with file into the directory /directory/subdirectory. The asterisk ("*") is a wildcard — a special character which expands to match other characters. Specifically, the asterisk wildcard matches zero or more non-whitespace characters. For instance, this command will copy any files named file, file001, file.txt, fileone.jpg, file-archive.zip, etc.
cp file*.jpg /directory/subdirectory
Copy every file in the working directory whose name begins with file, and ends with the file extension .jpg. For instance, it would make copies of any files named file, file001.jpg, file002.jpg, or file-new.jpg, etc. The copies will be placed into the directory /directory/subdirectory.
Copy an entire directory structure into another location:
cp -R /one/two /three/four
Copy the directory two (located in the directory /one), and everything two contains, into the destination directory /three/four. The result will be called /three/four/two. The directory /three must already exist for the command to succeed. If the directory four does not already exist in the directory /three, it will be created.

General Overview

Let's say you have a file named picture.jpg in your working directory, and you want to make a copy of it called picture-02.jpg. You would run the command:
cp picture.jpg picture-02.jpg
...and the file will be copied. Here, picture.jpg is the source of the copy operation, and picture-02.jpg is the destination. Both files now exist in your working directory.
The source and destination files may also reside in different directories. For instance,
cp /home/chuck/pictures/picture.jpg /home/chuck/backup/picture.jpg
...will make a copy of the file /home/chuck/pictures/picture.jpg in the directory /home/chuck/backup. The destination file will also be named picture.jpg.
If you are the user chuck, you can abbreviate your home directory ("/home/chuck") using a tilde ("~"). For instance,
cp ~/pictures/picture.jpg ~/backup/picture.jpg
...functions the same as the above command when it is run by chuck.
Copying Multiple Files To A Directory
Or, perhaps you want to copy multiple files into another directory. To accomplish this, you can specify multiple files as the source, and a directory name as the destination. Let's say you are the user sally, and you have a bunch of files in the directory /home/sally/pictures/ named picture-01.jpg, picture-02.jpg, etc. and you want to copy them into the directory /home/sally/picture-backup/. This command will do the trick:
cp ~/pictures/picture-*.jpg ~/picture-backup
Here, we use a wildcard (the asterisk, "*") to indicate that the source files are all the files in the directory /home/sally/pictures whose name starts with "picture-" and has the extension ".jpg". They will be copied into the directory /home/sally/picture-backup, assuming that directory already exists. If it doesn't exist, cp will give you an error message, and no files will be copied.
You can also specify multiple source files one after the other, and cp will expect that the final argument is a directory name, and copy them all there. For instance,
cp ~/pictures/picture-01.jpg ~/pictures/picture-02.jpg ~/picture-backup
...will copy only those two files, /home/sally/picture-01.jpg and /home/sally/picture-02.jpg, into the directory /home/sally/picture-backup.
Copying Files Recursively
You can use cp to copy entire directory structures from one place to another using the -R option to perform a recursive copy. Let's say you are the user steve and you have a directory, /home/steve/files, which contains many files and subdirectories. You want to copy all those files, and all the subdirectories (and the files and subdirectories they contain), to a new location, /home/steve/files-backup. You can copy all of them using the command:
cp -R ~/files ~/files-backup
...and the entire directory structure will be copied to the directory /home/steve/files-backup. When performing a recursive copy:
  • If the directory files-backup already exists, the directory files will be placed inside.
  • If files-backup does not already exist, it will be created and the contents of the files directory will be placed inside it.
Creating Symbolic Links Instead Of Copying Data
Another useful trick is to use cp to create symbolic links to your source files. You may already be familiar with using the ln command to create symlinks; cp is a great way to create multiple symlinks all at once.
cp will create symbolic links if you specify the -s option. So, for instance,
cp -s file.txt file2.txt
...will create a symbolic link, file2.txt, which points to file.txt.
You can also create symbolic links from multiple source files, specifying a directory as the destination.
Note: To create symbolic links in another directory, cp needs you to specify the full pathname, including the full directory name, in your source file name(s). Relative paths will not work.
Let's say you are user melissa and you have a set of files, file01.txt, file02.txt, etc. in the directory /home/melissa/myfiles. You want to create symbolic links to these files in the existing directory /home/melissa/myfiles2. This command will do the trick:
cp -s ~/myfiles/file*.txt ~/myfiles2
The directory myfiles2 will now contain symbolic links to the file*.txt in the directory /home/melissa/myfiles. The myfiles2 directory must already exist for the operation to succeed; if it doesn't exist, cp will give you an error message and nothing will be copied.
This will work with a recursive copy, as well. So the command:
cp -R -s ~/myfiles ~/myfiles2
...will re-create the directory structure of /home/melissa/myfiles, including any subdirectories and their contents; any files will be created as symlinks to the originals, but the directories will not be symbolic links, just regular directories. If myfiles2 already exists, cp will create a directory inside it called myfiles which contains the directory structure and symlinks; if myfiles2 does not already exist, it will be created, and contain the subdirectories and symlinks to the files that myfiles contains.
There are many other options you can provide to cp which will affect its behavior. These are listed, along with the precise command syntax, in the following sections.

How to Install and Use the Linux Bash Shell on Windows 10

What You Need to Know About Windows 10’s Bash Shell

This isn’t a virtual machine, a container, or Linux software compiled for Windows (like Cygwin). Instead, Windows 10 gains a Windows Subsystem for Linux, which is based on Microsoft’s abandoned Project Astoria work for running Android apps on Windows.
Think of it as the opposite of Wine. While Wine allows you to run Windows applications directly on Linux, the Windows Subsystem for Linux allows you to run Linux applications directly on Windows.
Microsoft has worked with Canonical to offer a full Ubuntu-based Bash shell that runs atop this subsystem. Technically, this isn’t Linux at all. Linux is the underlying operating system kernel, and that isn’t available here. Instead, this allows you to run the Bash shell and the exact same binaries you’d normally run on Ubuntu Linux. Free-software purists often argue the average Linux operating system  should be called “GNU/Linux” because it’s really a lot of GNU software running on the Linux kernel. The Bash shell you’ll get is really just all those GNU utilities and other software.
There are some limitations here. This won’t work with server software, and it won’t work with graphical software. It’s intended for developers who want to run Linux command-line utilities on Windows. These applications get access to the Windows file system, but you can’t use Bash commands to automate normal Windows programs, or launch Bash commands from the standard Windows command-line. They get access to the same Windows file system, but that’s it. Not every command-line application will work, either, as this feature is still in beta.

How to Install Bash on Windows 10

To get started, ensure you’ve installed the Windows 10 Anniversary Update. This only works on 64-bit builds of Windows 10, so it’s time to switch to the 64-bit version of Windows 10 if you’re still using the 32-bit version.
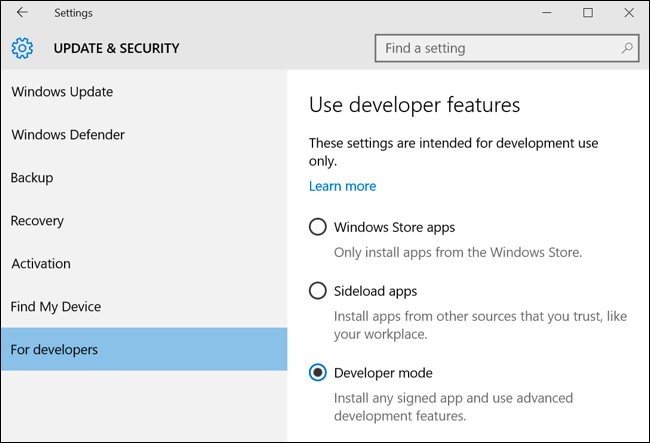
Once you’re sure you’re using the correct version of Windows 10, open the Settings app and head to Update & Security > For Developers. Activate the “Developer Mode” switch here to enable Developer Mode.

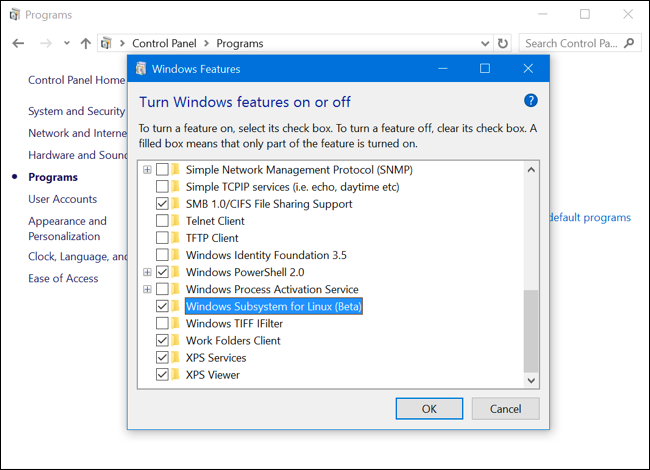
Next, open the Control Panel, click “Programs,” and click “Turn Windows Features On or Off” under Programs and Features. Enable the “Windows Subsystem for Linux (Beta)” option in the list here and click “OK.”
After you do, you’ll be prompted to reboot your computer. Click “Restart Now” to reboot your computer and Windows 10 will install the new feature.

After your computer restarts, click the Start button (or press the Windows key), type “bash”, and press “Enter.”

The first time you run the bash.exe file, you’ll be prompted to accept the terms of service. The command will then download the “Bash on Ubuntu on Windows” application from the Windows Store. You’ll be asked to create a user account and password for use in the Bash environment.

If you’d like to automate the installation of Bash instead, you can run the following command in a Command Prompt window. This will automatically agree to all prompts and set the default user to “root” with no password:
lxrun /install /y

How to Use Ubuntu’s Bash Shell and Install Linux Software

You’ll now have a full command-line bash shell based on Ubuntu. Because they’re the same binaries, you can use Ubuntu’s apt-get command to install software from Ubuntu’s repositories. You’ll have access to all the Linux command line software out there, although not every application may work perfectly–especially in the initial beta releases.
To open the Bash shell, just open your Start menu and search for “bash” or “Ubuntu.” You’ll see a “Bash on Ubuntu on Windows” application. You can pin this application shortcut to your Start menu, taskbar, or desktop for easier access.

If you’re experienced using a Bash shell on Linux, Mac OS X, or other platforms, you’ll be right at home. You don’t need to use sudo, as you’re given a root shell. The “root” user on UNIX platforms has  full system access, like the “Administrator” user on Windows. Your Windows file system is located at /mnt/c in the Bash shell environment.
Use the same Linux terminal commands you’d use to get around. If you’re used to the standard Windows Command Prompt with its DOS commands, here are a few basic commands on both Bash and Windows:
  • Change Directory: cd in Bash, cd or chdir in DOS
  • List Contents of Directory: ls in Bash, dir in DOS
  • Move or Rename a File: mv in Bash, move and rename in DOS
  • Copy a File: cp in Bash, copy in DOS
  • Delete a File: rm in Bash, del or erase in DOS
  • Create a Directory: mkdir in Bash, mkdir in DOS
  • Use a Text Editor: vi or nano in Bash, edit in DOS
It’s important to remember that, unlike Windows, the Bash shell and its Linux-imitating environment are case-sensitive. In other words, “File.txt” with a capital letter is different from “file.txt” without a capital.
For more instructions, consult our beginner’s guide to the Linux command-line and other similar introductions to the Bash shell, Ubuntu command line, and Linux terminal online.

You’ll need to use the apt-get command to install and update the Ubuntu environment’s software. Be sure to prefix these commands with “sudo”, which makes them run as root–the Linux equivalent of Administrator. Here are the apt-get commands you’ll need to know:
  • Download Updated Information About Available Packages: sudo apt-get update
  • Install an Application Package: sudo apt-get install packagename (Replace “packagename” with the package’s name.)
  • Uninstall an Application Package: sudo apt-get remove packagename (Replace “packagename” with the package’s name.)
  • Search for Available Packages: sudo apt-cache search word (Replace “word” with a word you want to search package names and descriptions for.)
  • Download and Install the Latest Versions of Your Installed Packages: sudo apt-get upgrade
Once you’ve downloaded and installed an application, you can type its name at the prompt and press Enter to run it. Check that particular application’s documentation for more details.

Bonus: Install the Ubuntu Font for a True Ubuntu Experience

If you want a more accurate Ubuntu experience on Windows 10, you can also install the Ubuntu fonts and enable them in the terminal.
Download the Ubuntu Font Family from Ubuntu’s website. Open the downloaded .zip file and locate the “UbuntuMono-R.ttf” file. This is the Ubuntu monospace font, which is the only one used in the terminal. It’s the only font you need to install.

Double-click the “UbuntuMono-R.ttf” file and you’ll see a preview of the font. Click “Install” to install it on your system.

To make the Ubuntu monospace font become an option in the console, you’ll need to add a setting to the Windows registry.
Open a registry editor by pressing Windows+R on your keyboard, typing regedit , and pressing Enter. Navigate to the following key:
HKEY_LOCAL_MACHINE\SOFTWARE\Microsoft\Windows NT\CurrentVersion\Console\TrueTypeFont

Right-click in the right pane and select New > String Value. Name it 000 .
Double-click the “000” string you just created and enter Ubuntu Mono as its value data.

Launch a Bash window, right-click the titlebar, and select “Properties”. Click the “Font” tab and select “Ubuntu Mono” in the font list.


Remember, software you install in the Bash shell is restricted to the Bash shell. You can’t access it from the Command Prompt, PowerShell, or elsewhere in Windows. Software in the Bash shell also can’t interact directly with or launch Windows programs, although the Bash environment and Windows have access to the same files on your computer.
However, you can create Bash shell scripts (.sh scripts) and run them with the Bash shell.

change password

The command to change your password is:
 passwd
Run this on the remote system after logged in. Nice and simple! Input old password, input new. Also, this works on any Unix system, not just Linux.

How To Use SSH to Connect to a Remote Server in Ubuntu

What Is SSH?

One essential tool to master as a system administrator is SSH.
SSH, or Secure Shell, is a protocol used to securely log onto remote systems. It is the most common way to access remote Linux and Unix-like servers.
In this guide, we will discuss how to use SSH to connect to a remote system.

Basic Syntax

The tool on Linux for connecting to a remote system using SSH is called, unsurprisingly, ssh.
The most basic form of the command is:
  • ssh remote_host
The remote_host in this example is the IP address or domain name that you are trying to connect to.
This command assumes that your username on the remote system is the same as your username on your local system.
If your username is different on the remote system, you can specify it by using this syntax:
  • ssh remote_username@remote_host
Once you have connected to the server, you will probably be asked to verify your identity by providing a password.
Later, we will cover how to generate keys to use instead of passwords.
To exit back into your local session, simply type:
  • exit

How Does SSH Work?

SSH works by connecting a client program to an ssh server.
In the above commands, ssh is the client program. The ssh server is already running on the remote_host that we specified.
In your Droplet, the sshd server should already be running. If this is not the case, click on the Console Access button from your Droplet page:
DigitalOcean Console Button
You will be presented with a login screen. Log in with your credentials.
The process needed to start an ssh server depends on the distribution of Linux that you are using.
On Ubuntu, you can start the ssh server on the Droplet by typing:
  • sudo service ssh start
On Ubuntu 16.04 and Debian Jessie, you can use systemctl, the systemd command for managing services:
  • sudo systemctl start ssh
That should start the sshd server and you can then log in remotely.

How To Configure SSH

When you change the configuration of SSH, you are changing the settings of the sshd server.
In Ubuntu, the main sshd configuration file is located at /etc/ssh/sshd_config.
Back up the current version of this file before editing:
  • sudo cp /etc/ssh/sshd_config{,.bak}
Open it with a text editor:
  • sudo nano /etc/ssh/sshd_config
You will want to leave most of the options in this file alone. However, there are a few you may want to take a look at:
/etc/ssh/sshd_config
Port 22
The port declaration specifies which port the sshd server will listen on for connections. By default, this is 22. You should probably leave this setting alone, unless you have specific reasons to do otherwise. If you do change your port, we will show you how to connect to the new port later on.
/etc/ssh/sshd_config
HostKey /etc/ssh/ssh_host_rsa_key
HostKey /etc/ssh/ssh_host_dsa_key
HostKey /etc/ssh/ssh_host_ecdsa_key
The host keys declarations specify where to look for global host keys. We will discuss what a host key is later.
/etc/ssh/sshd_config
SyslogFacility AUTH
LogLevel INFO
These two items indicate the level of logging that should occur.
If you are having difficulties with SSH, increasing the amount of logging may be a good way to discover what the issue is.
/etc/ssh/sshd_config
LoginGraceTime 120
PermitRootLogin yes
StrictModes yes
These parameters specify some of the login information.
LoginGraceTime specifies how many seconds to keep the connection alive without successfully logging in.
It may be a good idea to set this time just a little bit higher than the amount of time it takes you to log in normally.
PermitRootLogin selects whether root is allowed to log in.
In most cases, this should be changed to "no" when you have created user account that has access to elevated privileges (through su or sudo) and can log in through ssh.
strictModes is a safety guard that will refuse a login attempt if the authentication files are readable by everyone.
This prevents login attempts when the configuration files are not secure.
/etc/ssh/sshd_config
X11Forwarding yes
X11DisplayOffset 10
These parameters configure an ability called X11 Forwarding. This allows you to view a remote system's graphical user interface (GUI) on the local system.
This option must be enabled on the server and given with the SSH client during connection with the -X option.
If you changed any settings in /etc/ssh/sshd_config, make sure you restart your sshd server to implement your modifications:
  • sudo service ssh restart
Or, on systemd systems such as Ubuntu 16.04 or Debian Jessie:
  • sudo systemctl restart ssh
You should thoroughly test your changes to ensure that they operate in the way you expect.
It may be a good idea to have a few sessions active when you are making changes. This will allow you to revert the configuration if necessary.
If you run into problems, remember that you can log in through the Console link on your Droplet page.

How To Log Into SSH with Keys

While it is helpful to be able to log in to a remote system using passwords, it's a much better idea to set up key-based authentication.

How Does Key-based Authentication Work?

Key-based authentication works by creating a pair of keys: a private key and a public key.
The private key is located on the client machine and is secured and kept secret.
The public key can be given to anyone or placed on any server you wish to access.
When you attempt to connect using a key-pair, the server will use the public key to create a message for the client computer that can only be read with the private key.
The client computer then sends the appropriate response back to the server and the server will know that the client is legitimate.
This entire process is done in the background automatically after you set up keys.

How To Create SSH Keys

SSH keys should be generated on the computer you wish to log in from. This is usually your local computer.
Enter the following into the command line:
  • ssh-keygen -t rsa
Press enter to accept the defaults. Your keys will be created at ~/.ssh/id_rsa.pub and ~/.ssh/id_rsa.
Change into the .ssh directory by typing:
  • cd ~/.ssh
Look at the permissions of the files:
  • ls -l
Output
-rw-r--r-- 1 demo demo 807 Sep 9 22:15 authorized_keys -rw------- 1 demo demo 1679 Sep 9 23:13 id_rsa -rw-r--r-- 1 demo demo 396 Sep 9 23:13 id_rsa.pub
As you can see, the id_rsa file is readable and writable only to the owner. This is how it should be to keep it secret.
The id_rsa.pub file, however, can be shared and has permissions appropriate for this activity.

How To Transfer Your Public Key to the Server

You can copy the public key to the remote server by issuing this command:
  • ssh-copy-id remote_host
This will start an SSH session, which you will need to authenticate with your password.
After you enter your password, it will copy your public key to the server's authorized keys file, which will allow you to log in without the password next time.

Client-Side Options

There are a number of optional flags that you can select when connecting through SSH.
Some of these may be necessary to match the settings in the remote host's sshd configuration.
For instance, you if you changed the port number in your sshd configuration, you will need to match that port on the client-side by typing:
  • ssh -p port_number remote_host
If you only wish to execute a single command on a remote system, you can specify it after the host like so:
  • ssh remote_host command_to_run
You will connect to the remote machine, authenticate, and the command will be executed.
As we said before, if X11 forwarding is enabled on both computers, you can access that functionality by typing:
  • ssh -X remote_host
Providing you have the appropriate tools on your computer, GUI programs that you use on the remote system will now open their window on your local system.

Conclusion

Learning your way around SSH is a worthwhile pursuit, if only because it is such a common activity.
As you utilize the various options, you will discover more advanced functionality that can make your life easier. SSH has remained popular because it is secure, light-weight, and useful in diverse situations.

Monday, October 9, 2017

Repositories of Ubuntu

What are Repositories?

There are literally thousands of Ubuntu programs available to meet the needs of Ubuntu users. Many of these programs are stored in software archives commonly referred to as repositories. Repositories make it easy to install new software, while also providing a high level of security, since the software is thoroughly tested and built specifically for each version of Ubuntu.
Ubuntu distinguishes between software that is "free" and software that is not free. For details of Ubuntu's Free Software Philosophy please see here.
The four main repositories are:
  • Main - Canonical-supported free and open-source software.
  • Universe - Community-maintained free and open-source software.
  • Restricted - Proprietary drivers for devices.
  • Multiverse - Software restricted by copyright or legal issues.
The Ubuntu Install CDs contain software from the "Main" and "Restricted" repositories, so if you have no internet connection you can still install software from the CDs. If you have an internet connection you can install software from any Ubuntu repository.
This page describes how to manage software repositories in Ubuntu. For Kubuntu please see Kubuntu repository management.
GUI-based repository management is normally accomplished via "Software Sources". This interface can be accessed via several methods. One method is to go through the "Ubuntu Software Center". Open the software center, then from the Edit menu select "Software Sources". Note: You will have to enter your password to change settings in this window.
You can download a copy of a Canonical repository for your machine architecture (for example, i386) and use it offline (see AptGet/Offline/Repository).
IconsPage/info.png The operations described on this page modify the software repositories configuration file /etc/apt/sources.list. If you wish to, you can modify this file directly. For further details please see Managing Repositories from the Command Line.

Ubuntu Software Tab

Software Sources.png

The Four Main Repositories

The "Ubuntu Software" tab displays a list of repositories or "Channels". The four main repositories are:
  • Main - Canonical-supported free and open-source software.
  • Universe - Community-maintained free and open-source software.
  • Restricted - Proprietary drivers for devices.
  • Multiverse - Software restricted by copyright or legal issues.
For a detailed description of these repositories, see Repositories.
To disable a repository temporarily, untick the checkbox next to its name.
Select "Close" to save your changes. A dialog box should appear, asking whether you'd like to update the list of repositories. Select "Reload" to update the list.
  • Repobuttons.png
The Close, Reload, and Revert buttons each perform special functions with regard to the repository pages.
  • Close. The 'Close' button must be selected to execute any change(s). If the action would change system files, they are written at this time.
  • Reload. Any time a setting is changed which alters a repository setting the 'Reload' button should be selected to allow the applicable repository database to be updated. Repository information will not normally be updated until the 'Reload' button is selected. If you do not wish to use 'Reload', select 'Close' to exit without updating the database.
  • Revert. The 'Revert' button erases changes made since the last save. It merely cancels pending changes which have not been executed, returning the selections to their prior state. The button does not return system files to the original installation settings.

Download Server

Copies of the main repositories are available on different servers round the world. The fastest server for you will often be a server close geographically to you.
If you have problems with your current server (for example, the server is slow or you cannot find a package you expect) then select another server by clicking the "Download from:" list.
If you click "Select Best Server", Ubuntu will attempt (on this occasion only) to find the fastest server. Once you select a server it remains the selected server until you change it. Note: The fastest server now may not be the fastest server at another time.

CD-ROM/DVD

The option to install from CD-ROM may be selected or deselected from this window (in the section "Installable from CD-ROM/DVD").
Software Sources.png
If the option is selected, the system will attempt to search the CD-ROM during package installs. If the CD-ROM is not present, the system will request its insertion.
Deselect this option if you do not plan to install packages from CD-ROM. Once the option is deselected the system will no longer check if a CD-ROM is present.

Other Software Tab

Enabling Canonical Partner Repositories

The "Other Software" tab is where you can enable Canonical Partner Repositories. The partner repositories offer access to proprietary and closed-source software and are disabled by default. If you wish to enable a partner repository, tick it, enter your password, click "Close", and then click "Reload".
In the screenshot below two partner repositories are listed - one for applications (enabled) and one for source code (disabled).
Other Software tab_001.png

CD-ROM/DVD

You can add software sources on CD-ROM/DVD using this tab. To add such a source, insert the CD-ROM/DVD and click the "Add Volume" button. Once you have added the CD-ROM/DVD, it will be searched for packages during installation requests.

Adding Personal Package Archives (PPAs)

Personal Package Archives (PPAs) are a kind of repository. Developers create them in order to distribute their software. In order to add a PPA you need its "location", which is in the format ppa:[username]/[ppaname]. You can find this information on the PPA's Launchpad page.
IconsPage/warning.png Packages in PPAs do not undergo the same process of validation as packages in the main repositories. PPAs are a low-security alternative to the main repositories, so the user will be installing software at their own risk.
To add a PPA to your system's software sources:
  • Navigate to Ubuntu Software Centre > Edit > Software Sources > Other Software.
    Other Software tab_001.png
  • Click Add.
    Add-PPA.png
  • Enter the PPA's location (as described above).
  • Click Add Source.
    Authenticate_001.png
  • Enter your password.
  • Click Authenticate.
  • Click Close.
  • If you are asked if you want to reload the information about available software, click Reload.
You have now added the PPA and can install packages from it.

Adding a PPA using the command-line

Make sure you have the package python-software-properties installed.
Step 1: On the PPA's Launchpad page, look for the heading that reads "Adding this PPA to your system". Make a note of the PPA's location, which has the format ppa:user/ppa-name.
Step 2: Open a terminal and enter:
sudo add-apt-repository ppa:user/ppa-name
Replace 'ppa:user/ppa-name' with the PPA's location that you noted above.
Your system will now fetch the PPA's key. This enables your system to verify that the packages in the PPA have not been interfered with since they were built.
Step 3: Now, as a one-off, tell your system to pull down the latest list of software from each archive it knows about, including the PPA you just added:
sudo apt-get update
Now you're ready to start installing software from the PPA!

Adding Extra Repositories

There are times when you might want to add extra repositories to your system's software sources (that is, in addition to the repositories provided by Canonical). For example, there is at least one repository that "caters to the Ubuntu gamer".
IconsPage/warning.png Make sure that any repositories that you add have been tested and are known to work on Ubuntu systems. Repositories that are not designed to work with your version of Ubuntu can introduce inconsistencies in your system and might force you to re-install.
In order to add a repository you need its "location" and the "key command" (the command that will add the repository's key to your system). For an explanation of the format of the "location", see the Editing Repository Details section below.
To add a repository to your system's software sources:
  • Navigate to Ubuntu Software Centre > Edit > Software Sources > Other Software.
    Other Software tab_001.png
  • Click Add.
    Add-PPA.png
  • Enter the repository's location.
  • Click Add Source.
    Authenticate_001.png
  • Enter your password.
  • Click Authenticate.
  • Click Close.
  • If you are asked if you want to reload the information about available software, click Reload.
  • In a terminal enter the "key command".
You have now added the repository and can install packages from it.

Editing Repository Details

To edit a repository's details, select the repository in the list and click the Edit button. A dialog box displays the apt line, broken up into its components.
SoftwareSources-EditSource.png
The fields are as follows:
  • Type designated as "binary" (deb) for software in binary format or "Source" (src) for source code format. Select the option that corresponds to the repository.
  • URI Enter a valid Uniform Resource Indicator or URI for the software repository. Here's a list of examples:
    • cdrom
      cdrom:[description_of_cd]/ 
    • ftp
      ftp://ftp.domain.ext/path/to/repository 
    • http
      http://www.domain.ext/path/to/repository 
    • smb (works only when the computer is connected to a Samba share)
      smb://path/to/repository   
    • nfs (works only if the computer is connected to a NFS share)
      file://path/to/local/directory   
  • Distribution
    Select the name of the distribution or the name of the distribution version.
  • Components
    Select the repository section to access. Add more sections separated by spaces.
  • Comment
    Add a comment to describe the repository for easier reference.

Removing & Disabling Repositories

The "Other Software" tab lists your repositories and PPAs (except for Main, Universe, Restricted, and Multiverse).
To disable a repository temporarily, untick the checkbox next to the source. You can enable the repository again by re-ticking the checkbox.
To remove a repository permanently from the list, highlight the repository and click "Remove".

Updates Tab

SoftwareSources-Updates.png
The Updates tab is where you set when and how Ubuntu receives system updates. If you make any changes don't forget to "Close" and "Reload" so that your system's software sources will be updated.

Install updates from:

  • "Important security updates (...)". Updates that fix security vulnerabilities. They are managed by the Ubuntu Security Team and are designed to change the behavior of the package as little as possible -- in fact, the minimum required to resolve the security problem. As a result, they tend to be very low-risk to apply and all users are urged to apply security updates.
  • "Recommended updates (...)". Updates for serious bugs other than security vulnerabilities.
  • "Unsupported updates (...)". New versions of packages which have been backported to an older release. Packages may contain new features, may introduce new interfaces, and bugs. Such updates are not supported by Canonical on the release they have been backported to but they have been tested by members of the Ubuntu community. For more information on backports, visit UbuntuBackports

Automatic Updates

This section allows the user to set the frequency and manner of updates.

Notify me of a new Ubuntu version:

Allows users to upgrade to new versions of Ubuntu.
  • "Normal Releases" - Notifies the user of an upgrade from one regular release to another, such as from Ubuntu 12.10 (Quantal Quetzal) to Ubuntu 13.04 (Raring Ringtail).
  • "Long Term Support Releases Only" - Notifies the user of an upgrade between Long Term Support releases, such as from Ubuntu 10.04 (Lucid Lynx) LTS to Ubuntu 12.04 (Precise Pangolin) LTS but not to other distributions which were not designated Long Term Support releases.

Authentication Tab

SoftwareSources-Authentication.png
The Authentication tab lists the keys for your repositories (but not your PPAs). Note: PPAs do have keys but the system handles them automatically and they are not listed here.
When you add a repository to your system's software sources the maintainer of the repository will normally tell you how to add the key.
If the maintainer does not tell you how to add the key then you need to find the "key hash" of the repository in order to look up the key on a public key server. Once you know the key hash, the key can be retrieved using the command:
gpg --keyserver [name of keyserver] --recv-keys [keyhash] 
For example, if the key hash is CE49EC21, you retrieve the key using the command:
gpg --keyserver subkeys.pgp.net --recv-keys CE49EC21 
Then, add the key to Ubuntu's apt trusted keys database using the command:
gpg --export --armor CE49EC21 | sudo apt-key add - 
Note: There's a dash at the end of the line above.
IconsPage/info.png For more on apt and authentication keys, see SecureApt.

Integration with Ubuntu Software Center

UbuntuSoftwareCenter.png
Ubuntu Software Center is the GUI-based method to add or remove applications. It allows the user to selectively choose the repositories to be searched and then presents a list of applications with a brief description of each application.
By default Ubuntu Software Center searches all (enabled) repositories. If you wish to search one repository only then click the down arrow to the right of All Software and select the repository that you wish to search.
Software Sources is accessible from the Ubuntu Software Center via the Edit, Software Sources menu. The contents of Ubuntu Software Center are updated whenever a repository is added, deleted or changed via Software Sources. While the repository list is updating the Progress icon is displayed in the top bar of Ubuntu Software Center.

Exploring the Repositories

There are several GUI-based methods you can use to explore the repositories. One is to open Synaptic Package Manager and click on the Origin button. This will display a repository list in the window above the button. The list will contain all the repositories enabled in your system's software sources. To the right will be the packages available via download (white boxes) and currently installed packages (green boxes).
There are two cropped images of the main Synaptic window below:
  • The image on the left shows the results of selecting Local/main (packages from the Main repository stored locally). Local packages are packages stored on the user's computer.
  • The image on the right displays the results of selecting archive.ubuntu.com/main (the Main repository).
softwaresources.packages1.png

Finding a Package's Repository

It is sometimes useful to find a package's repository (the repository that the package was installed from). If you highlight the package and click the Properties button you may be able to determine the repository in the Section: area. The name in parentheses (if any) is the repository. For example, from the screenshot below we can see that the rar package's repository is Multiverse.
properties.png
Another method to find a package's repository is to visit http://packages.ubuntu.com/. The search box is an easy method to quickly locate a package maintained by the Ubuntu team. Several input selections are available to help the user refine the search.
(Note: Some packages are not available from a repository or PPA, instead they are available as Debian packages.)