Introduction
A “LAMP” stack is a group of open-source software that is typically installed together to enable a server to host dynamic websites and web apps. This term is actually an acronym which represents the Linux operating system, with the Apache web server. The site data is stored in a MySQL database, and dynamic content is processed by PHP.
In this guide, we will install a LAMP stack on an Ubuntu 18.04 server.
Prerequisites
In order to complete this tutorial, you will need to have an Ubuntu 18.04 server with a non-root
sudo-enabled user account and a basic firewall. This can be configured using our initial server setup guide for Ubuntu 18.04.Step 1 — Installing Apache and Updating the Firewall
The Apache web server is among the most popular web servers in the world. It’s well-documented and has been in wide use for much of the history of the web, which makes it a great default choice for hosting a website.
Install Apache using Ubuntu’s package manager,
apt:
- sudo apt update
- sudo apt install apache2
Since this is a
sudo command, these operations are executed with root privileges. It will ask you for your regular user’s password to verify your intentions.
Once you’ve entered your password,
apt will tell you which packages it plans to install and how much extra disk space they’ll take up. Press Y and hit ENTER to continue, and the installation will proceed.Adjust the Firewall to Allow Web Traffic
Next, assuming that you have followed the initial server setup instructions and enabled the UFW firewall, make sure that your firewall allows HTTP and HTTPS traffic. You can check that UFW has an application profile for Apache like so:
- sudo ufw app list
Output
Available applications:
  Apache
  Apache Full
  Apache Secure
  OpenSSH
If you look at the
Apache Full profile, it should show that it enables traffic to ports 80 and 443:
- sudo ufw app info "Apache Full"
Output
Profile: Apache Full
Title: Web Server (HTTP,HTTPS)
Description: Apache v2 is the next generation of the omnipresent Apache web
server.

Ports:
  80,443/tcp
Allow incoming HTTP and HTTPS traffic for this profile:
- sudo ufw allow in "Apache Full"
You can do a spot check right away to verify that everything went as planned by visiting your server’s public IP address in your web browser (see the note under the next heading to find out what your public IP address is if you do not have this information already):
http://your_server_ip
You will see the default Ubuntu 18.04 Apache web page, which is there for informational and testing purposes. It should look something like this:

If you see this page, then your web server is now correctly installed and accessible through your firewall.
How To Find your Server’s Public IP Address
If you do not know what your server’s public IP address is, there are a number of ways you can find it. Usually, this is the address you use to connect to your server through SSH.
There are a few different ways to do this from the command line. First, you could use the
iproute2 tools to get your IP address by typing this:
- ip addr show eth0 | grep inet | awk '{ print $2; }' | sed 's/\/.*$//'
This will give you two or three lines back. They are all correct addresses, but your computer may only be able to use one of them, so feel free to try each one.
An alternative method is to use the
curl utility to contact an outside party to tell you how it sees your server. This is done by asking a specific server what your IP address is:
- sudo apt install curl
- curl http://icanhazip.com
Regardless of the method you use to get your IP address, type it into your web browser’s address bar to view the default Apache page.
Step 2 — Installing MySQL
Now that you have your web server up and running, it is time to install MySQL. MySQL is a database management system. Basically, it will organize and provide access to databases where your site can store information.
Again, use
apt to acquire and install this software:
- sudo apt install mysql-server
Note: In this case, you do not have to run
sudo apt update prior to the command. This is because you recently ran it in the commands above to install Apache. The package index on your computer should already be up-to-date.
This command, too, will show you a list of the packages that will be installed, along with the amount of disk space they’ll take up. Enter
Y to continue.
When the installation is complete, run a simple security script that comes pre-installed with MySQL which will remove some dangerous defaults and lock down access to your database system. Start the interactive script by running:
- sudo mysql_secure_installation
This will ask if you want to configure the
VALIDATE PASSWORD PLUGIN.
Note: Enabling this feature is something of a judgment call. If enabled, passwords which don’t match the specified criteria will be rejected by MySQL with an error. This will cause issues if you use a weak password in conjunction with software which automatically configures MySQL user credentials, such as the Ubuntu packages for phpMyAdmin. It is safe to leave validation disabled, but you should always use strong, unique passwords for database credentials.
Answer
Y for yes, or anything else to continue without enabling.VALIDATE PASSWORD PLUGIN can be used to test passwords
and improve security. It checks the strength of password
and allows the users to set only those passwords which are
secure enough. Would you like to setup VALIDATE PASSWORD plugin?
Press y|Y for Yes, any other key for No:
If you answer “yes”, you’ll be asked to select a level of password validation. Keep in mind that if you enter
2 for the strongest level, you will receive errors when attempting to set any password which does not contain numbers, upper and lowercase letters, and special characters, or which is based on common dictionary words.There are three levels of password validation policy:
LOW Length >= 8
MEDIUM Length >= 8, numeric, mixed case, and special characters
STRONG Length >= 8, numeric, mixed case, special characters and dictionary file
Please enter 0 = LOW, 1 = MEDIUM and 2 = STRONG: 1
Regardless of whether you chose to set up the
VALIDATE PASSWORD PLUGIN, your server will next ask you to select and confirm a password for the MySQL root user. This is an administrative account in MySQL that has increased privileges. Think of it as being similar to the root account for the server itself (although the one you are configuring now is a MySQL-specific account). Make sure this is a strong, unique password, and do not leave it blank.
If you enabled password validation, you’ll be shown the password strength for the root password you just entered and your server will ask if you want to change that password. If you are happy with your current password, enter
N for “no” at the prompt:Using existing password for root.
Estimated strength of the password: 100
Change the password for root ? ((Press y|Y for Yes, any other key for No) : n
For the rest of the questions, press
Y and hit the ENTER key at each prompt. This will remove some anonymous users and the test database, disable remote root logins, and load these new rules so that MySQL immediately respects the changes you have made.
Note that in Ubuntu systems running MySQL 5.7 (and later versions), the root MySQL user is set to authenticate using the
auth_socket plugin by default rather than with a password. This allows for some greater security and usability in many cases, but it can also complicate things when you need to allow an external program (e.g., phpMyAdmin) to access the user.
If you prefer to use a password when connecting to MySQL as root, you will need to switch its authentication method from
auth_socket to mysql_native_password. To do this, open up the MySQL prompt from your terminal:
- sudo mysql
Next, check which authentication method each of your MySQL user accounts use with the following command:
- SELECT user,authentication_string,plugin,host FROM mysql.user;
Output
+------------------+-------------------------------------------+-----------------------+-----------+
| user             | authentication_string                     | plugin                | host      |
+------------------+-------------------------------------------+-----------------------+-----------+
| root             |                                           | auth_socket           | localhost |
| mysql.session    | *THISISNOTAVALIDPASSWORDTHATCANBEUSEDHERE | mysql_native_password | localhost |
| mysql.sys        | *THISISNOTAVALIDPASSWORDTHATCANBEUSEDHERE | mysql_native_password | localhost |
| debian-sys-maint | *CC744277A401A7D25BE1CA89AFF17BF607F876FF | mysql_native_password | localhost |
+------------------+-------------------------------------------+-----------------------+-----------+
4 rows in set (0.00 sec)
In this example, you can see that the root user does in fact authenticate using the
auth_socket plugin. To configure the root account to authenticate with a password, run the following ALTER USER command. Be sure to change password to a strong password of your choosing:
- ALTER USER 'root'@'localhost' IDENTIFIED WITH mysql_native_password BY 'password';
Then, run
FLUSH PRIVILEGES which tells the server to reload the grant tables and put your new changes into effect:
- FLUSH PRIVILEGES;
Check the authentication methods employed by each of your users again to confirm that root no longer authenticates using the
auth_socket plugin:
- SELECT user,authentication_string,plugin,host FROM mysql.user;
Output
+------------------+-------------------------------------------+-----------------------+-----------+
| user             | authentication_string                     | plugin                | host      |
+------------------+-------------------------------------------+-----------------------+-----------+
| root             | *3636DACC8616D997782ADD0839F92C1571D6D78F | mysql_native_password | localhost |
| mysql.session    | *THISISNOTAVALIDPASSWORDTHATCANBEUSEDHERE | mysql_native_password | localhost |
| mysql.sys        | *THISISNOTAVALIDPASSWORDTHATCANBEUSEDHERE | mysql_native_password | localhost |
| debian-sys-maint | *CC744277A401A7D25BE1CA89AFF17BF607F876FF | mysql_native_password | localhost |
+------------------+-------------------------------------------+-----------------------+-----------+
4 rows in set (0.00 sec)
You can see in this example output that the root MySQL user now authenticates using a password. Once you confirm this on your own server, you can exit the MySQL shell:
- exit
At this point, your database system is now set up and you can move on to installing PHP, the final component of the LAMP stack.
Step 3 — Installing PHP
PHP is the component of your setup that will process code to display dynamic content. It can run scripts, connect to your MySQL databases to get information, and hand the processed content over to your web server to display.
Once again, leverage the
apt system to install PHP. In addition, include some helper packages this time so that PHP code can run under the Apache server and talk to your MySQL database:
- sudo apt install php libapache2-mod-php php-mysql
This should install PHP without any problems. We’ll test this in a moment.
In most cases, you will want to modify the way that Apache serves files when a directory is requested. Currently, if a user requests a directory from the server, Apache will first look for a file called
index.html. We want to tell the web server to prefer PHP files over others, so make Apache look for an index.php file first.
To do this, type this command to open the
dir.conf file in a text editor with root privileges:
- sudo nano /etc/apache2/mods-enabled/dir.conf
It will look like this:
/etc/apache2/mods-enabled/dir.conf
<IfModule mod_dir.c>
    DirectoryIndex index.html index.cgi index.pl index.php index.xhtml index.htm
</IfModule>
Move the PHP index file (highlighted above) to the first position after the
DirectoryIndex specification, like this:
/etc/apache2/mods-enabled/dir.conf
<IfModule mod_dir.c>
    DirectoryIndex index.php index.html index.cgi index.pl index.xhtml index.htm
</IfModule>
When you are finished, save and close the file by pressing
CTRL+X. Confirm the save by typing Y and then hit ENTER to verify the file save location.
After this, restart the Apache web server in order for your changes to be recognized. Do this by typing this:
- sudo systemctl restart apache2
You can also check on the status of the
apache2 service using systemctl:
- sudo systemctl status apache2
Sample Output
● apache2.service - LSB: Apache2 web server
   Loaded: loaded (/etc/init.d/apache2; bad; vendor preset: enabled)
  Drop-In: /lib/systemd/system/apache2.service.d
           └─apache2-systemd.conf
   Active: active (running) since Tue 2018-04-23 14:28:43 EDT; 45s ago
     Docs: man:systemd-sysv-generator(8)
  Process: 13581 ExecStop=/etc/init.d/apache2 stop (code=exited, status=0/SUCCESS)
  Process: 13605 ExecStart=/etc/init.d/apache2 start (code=exited, status=0/SUCCESS)
    Tasks: 6 (limit: 512)
   CGroup: /system.slice/apache2.service
           ├─13623 /usr/sbin/apache2 -k start
           ├─13626 /usr/sbin/apache2 -k start
           ├─13627 /usr/sbin/apache2 -k start
           ├─13628 /usr/sbin/apache2 -k start
           ├─13629 /usr/sbin/apache2 -k start
           └─13630 /usr/sbin/apache2 -k start
Press
Q to exit this status output.
To enhance the functionality of PHP, you have the option to install some additional modules. To see the available options for PHP modules and libraries, pipe the results of
apt search into less, a pager which lets you scroll through the output of other commands:
- apt search php- | less
Use the arrow keys to scroll up and down, and press
Q to quit.
The results are all optional components that you can install. It will give you a short description for each:
bandwidthd-pgsql/bionic 2.0.1+cvs20090917-10ubuntu1 amd64
  Tracks usage of TCP/IP and builds html files with graphs

bluefish/bionic 2.2.10-1 amd64
  advanced Gtk+ text editor for web and software development

cacti/bionic 1.1.38+ds1-1 all
  web interface for graphing of monitoring systems

ganglia-webfrontend/bionic 3.6.1-3 all
  cluster monitoring toolkit - web front-end

golang-github-unknwon-cae-dev/bionic 0.0~git20160715.0.c6aac99-4 all
  PHP-like Compression and Archive Extensions in Go

haserl/bionic 0.9.35-2 amd64
  CGI scripting program for embedded environments

kdevelop-php-docs/bionic 5.2.1-1ubuntu2 all
  transitional package for kdevelop-php

kdevelop-php-docs-l10n/bionic 5.2.1-1ubuntu2 all
  transitional package for kdevelop-php-l10n
…
:
To learn more about what each module does, you could search the internet for more information about them. Alternatively, look at the long description of the package by typing:
- apt show package_name
There will be a lot of output, with one field called
Description which will have a longer explanation of the functionality that the module provides.
For example, to find out what the
php-cli module does, you could type this:
- apt show php-cli
Along with a large amount of other information, you’ll find something that looks like this:
Output
…
Description: command-line interpreter for the PHP scripting language (default)
 This package provides the /usr/bin/php command interpreter, useful for
 testing PHP scripts from a shell or performing general shell scripting tasks.
 .
 PHP (recursive acronym for PHP: Hypertext Preprocessor) is a widely-used
 open source general-purpose scripting language that is especially suited
 for web development and can be embedded into HTML.
 .
 This package is a dependency package, which depends on Ubuntu's default
 PHP version (currently 7.2).
…
If, after researching, you decide you would like to install a package, you can do so by using the
apt install command like you have been doing for the other software.
If you decided that
php-cli is something that you need, you could type:
- sudo apt install php-cli
If you want to install more than one module, you can do that by listing each one, separated by a space, following the
apt install command, like this:
- sudo apt install package1 package2 ...
At this point, your LAMP stack is installed and configured. Before you do anything else, we recommend that you set up an Apache virtual host where you can store your server’s configuration details.
Step 4 — Setting Up Virtual Hosts (Recommended)
When using the Apache web server, you can use virtual hosts (similar to server blocks in Nginx) to encapsulate configuration details and host more than one domain from a single server. We will set up a domain called your_domain, but you should replace this with your own domain name. To learn more about setting up a domain name with DigitalOcean, see our Introduction to DigitalOcean DNS.
Apache on Ubuntu 18.04 has one server block enabled by default that is configured to serve documents from the
/var/www/html directory. While this works well for a single site, it can become unwieldy if you are hosting multiple sites. Instead of modifying /var/www/html, let’s create a directory structure within /var/www for our your_domain site, leaving /var/www/html in place as the default directory to be served if a client request doesn’t match any other sites.
Create the directory for your_domain as follows:
sudo mkdir /var/www/your_domain
Next, assign ownership of the directory with the
$USER environment variable:
- sudo chown -R $USER:$USER /var/www/your_domain
The permissions of your web roots should be correct if you haven’t modified your
unmask value, but you can make sure by typing:
- sudo chmod -R 755 /var/www/your_domain
Next, create a sample
index.html page using nano or your favorite editor:
- nano /var/www/your_domain/index.html
Inside, add the following sample HTML:
/var/www/your_domain/index.html
<html>
    <head>
        <title>Welcome to Your_domain!</title>
    </head>
    <body>
        <h1>Success!  The your_domain server block is working!</h1>
    </body>
</html>
Save and close the file when you are finished.
In order for Apache to serve this content, it’s necessary to create a virtual host file with the correct directives. Instead of modifying the default configuration file located at
/etc/apache2/sites-available/000-default.conf directly, let’s make a new one at /etc/apache2/sites-available/your_domain.conf:
- sudo nano /etc/apache2/sites-available/your_domain.conf
Paste in the following configuration block, which is similar to the default, but updated for our new directory and domain name:
/etc/apache2/sites-available/your_domain.conf
<VirtualHost *:80>
    ServerAdmin webmaster@localhost
    ServerName your_domain
    ServerAlias www.your_domain
    DocumentRoot /var/www/your_domain
    ErrorLog ${APACHE_LOG_DIR}/error.log
    CustomLog ${APACHE_LOG_DIR}/access.log combined
</VirtualHost>
Notice that we’ve updated the
DocumentRoot to our new directory and ServerAdmin to an email that the your_domain site administrator can access. We’ve also added two directives: ServerName, which establishes the base domain that should match for this virtual host definition, and ServerAlias, which defines further names that should match as if they were the base name.
Save and close the file when you are finished.
Let’s enable the file with the
a2ensite tool:
- sudo a2ensite your_domain.conf
Disable the default site defined in
000-default.conf:
- sudo a2dissite 000-default.conf
Next, let’s test for configuration errors:
- sudo apache2ctl configtest
You should see the following output:
Output
Syntax OK
Restart Apache to implement your changes:
- sudo systemctl restart apache2
Apache should now be serving your domain name. You can test this by navigating to
http://your_domain, where you should see something like this:
With that, you virtual host is fully set up. Before making any more changes or deploying an application, though, it would be helpful to proactively test out your PHP configuration in case there are any issues that should be addressed.
Step 5 — Testing PHP Processing on your Web Server
In order to test that your system is configured properly for PHP, create a very basic PHP script called
info.php. In order for Apache to find this file and serve it correctly, it must be saved to your web root directory.
Create the file at the web root you created in the previous step by running:
- sudo nano /var/www/your_domain/info.php
This will open a blank file. Add the following text, which is valid PHP code, inside the file:
info.php
<?php
phpinfo();
?>
When you are finished, save and close the file.
Now you can test whether your web server is able to correctly display content generated by this PHP script. To try this out, visit this page in your web browser. You’ll need your server’s public IP address again.
The address you will want to visit is:
http://your_domain/info.php
The page that you come to should look something like this:
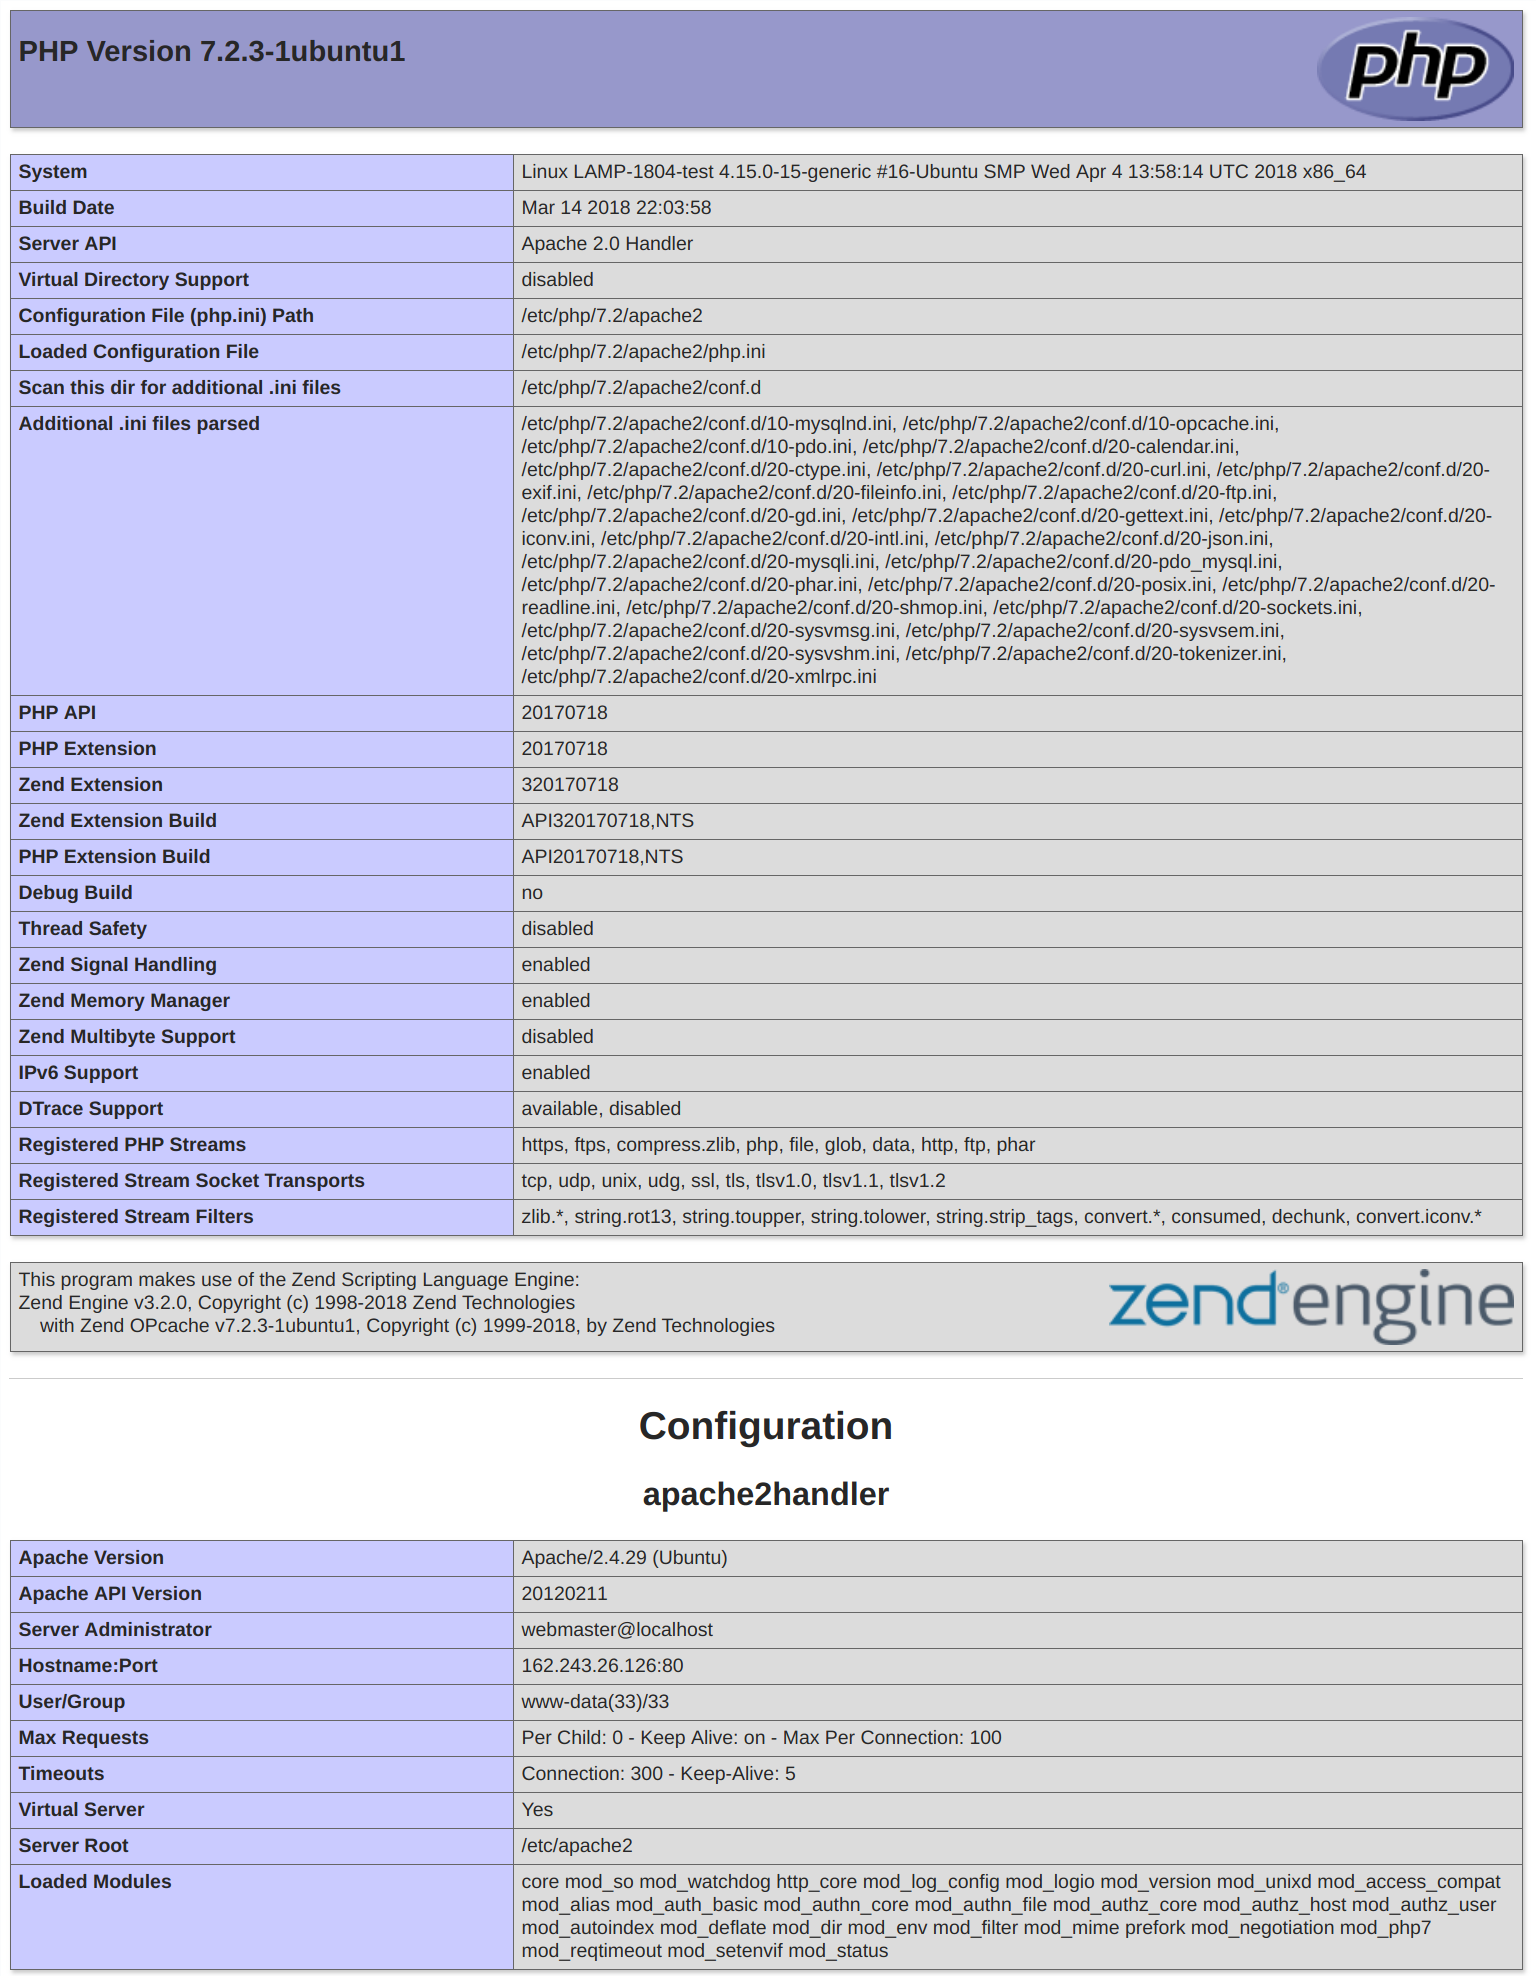
This page provides some basic information about your server from the perspective of PHP. It is useful for debugging and to ensure that your settings are being applied correctly.
If you can see this page in your browser, then your PHP is working as expected.
You probably want to remove this file after this test because it could actually give information about your server to unauthorized users. To do this, run the following command:
- sudo rm /var/www/your_domain/info.php
You can always recreate this page if you need to access the information again later.
Conclusion
Now that you have a LAMP stack installed, you have many choices for what to do next. Basically, you’ve installed a platform that will allow you to install most kinds of websites and web software on your server.
As an immediate next step, you should ensure that connections to your web server are secured, by serving them via HTTPS. The easiest option here is to use Let’s Encrypt to secure your site with a free TLS/SSL certificate.
Some other popular options are:
- Install Wordpress the most popular content management system on the internet.
- Set Up PHPMyAdmin to help manage your MySQL databases from web browser.
- Learn how to use SFTP to transfer files to and from your server.