Tuesday, October 10, 2017

change password

The command to change your password is:
 passwd
Run this on the remote system after logged in. Nice and simple! Input old password, input new. Also, this works on any Unix system, not just Linux.

How To Use SSH to Connect to a Remote Server in Ubuntu

What Is SSH?

One essential tool to master as a system administrator is SSH.
SSH, or Secure Shell, is a protocol used to securely log onto remote systems. It is the most common way to access remote Linux and Unix-like servers.
In this guide, we will discuss how to use SSH to connect to a remote system.

Basic Syntax

The tool on Linux for connecting to a remote system using SSH is called, unsurprisingly, ssh.
The most basic form of the command is:
  • ssh remote_host
The remote_host in this example is the IP address or domain name that you are trying to connect to.
This command assumes that your username on the remote system is the same as your username on your local system.
If your username is different on the remote system, you can specify it by using this syntax:
  • ssh remote_username@remote_host
Once you have connected to the server, you will probably be asked to verify your identity by providing a password.
Later, we will cover how to generate keys to use instead of passwords.
To exit back into your local session, simply type:
  • exit

How Does SSH Work?

SSH works by connecting a client program to an ssh server.
In the above commands, ssh is the client program. The ssh server is already running on the remote_host that we specified.
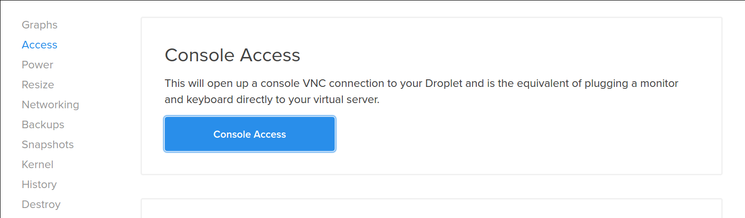
In your Droplet, the sshd server should already be running. If this is not the case, click on the Console Access button from your Droplet page:
DigitalOcean Console Button
You will be presented with a login screen. Log in with your credentials.
The process needed to start an ssh server depends on the distribution of Linux that you are using.
On Ubuntu, you can start the ssh server on the Droplet by typing:
  • sudo service ssh start
On Ubuntu 16.04 and Debian Jessie, you can use systemctl, the systemd command for managing services:
  • sudo systemctl start ssh
That should start the sshd server and you can then log in remotely.

How To Configure SSH

When you change the configuration of SSH, you are changing the settings of the sshd server.
In Ubuntu, the main sshd configuration file is located at /etc/ssh/sshd_config.
Back up the current version of this file before editing:
  • sudo cp /etc/ssh/sshd_config{,.bak}
Open it with a text editor:
  • sudo nano /etc/ssh/sshd_config
You will want to leave most of the options in this file alone. However, there are a few you may want to take a look at:
/etc/ssh/sshd_config
Port 22
The port declaration specifies which port the sshd server will listen on for connections. By default, this is 22. You should probably leave this setting alone, unless you have specific reasons to do otherwise. If you do change your port, we will show you how to connect to the new port later on.
/etc/ssh/sshd_config
HostKey /etc/ssh/ssh_host_rsa_key
HostKey /etc/ssh/ssh_host_dsa_key
HostKey /etc/ssh/ssh_host_ecdsa_key
The host keys declarations specify where to look for global host keys. We will discuss what a host key is later.
/etc/ssh/sshd_config
SyslogFacility AUTH
LogLevel INFO
These two items indicate the level of logging that should occur.
If you are having difficulties with SSH, increasing the amount of logging may be a good way to discover what the issue is.
/etc/ssh/sshd_config
LoginGraceTime 120
PermitRootLogin yes
StrictModes yes
These parameters specify some of the login information.
LoginGraceTime specifies how many seconds to keep the connection alive without successfully logging in.
It may be a good idea to set this time just a little bit higher than the amount of time it takes you to log in normally.
PermitRootLogin selects whether root is allowed to log in.
In most cases, this should be changed to "no" when you have created user account that has access to elevated privileges (through su or sudo) and can log in through ssh.
strictModes is a safety guard that will refuse a login attempt if the authentication files are readable by everyone.
This prevents login attempts when the configuration files are not secure.
/etc/ssh/sshd_config
X11Forwarding yes
X11DisplayOffset 10
These parameters configure an ability called X11 Forwarding. This allows you to view a remote system's graphical user interface (GUI) on the local system.
This option must be enabled on the server and given with the SSH client during connection with the -X option.
If you changed any settings in /etc/ssh/sshd_config, make sure you restart your sshd server to implement your modifications:
  • sudo service ssh restart
Or, on systemd systems such as Ubuntu 16.04 or Debian Jessie:
  • sudo systemctl restart ssh
You should thoroughly test your changes to ensure that they operate in the way you expect.
It may be a good idea to have a few sessions active when you are making changes. This will allow you to revert the configuration if necessary.
If you run into problems, remember that you can log in through the Console link on your Droplet page.

How To Log Into SSH with Keys

While it is helpful to be able to log in to a remote system using passwords, it's a much better idea to set up key-based authentication.

How Does Key-based Authentication Work?

Key-based authentication works by creating a pair of keys: a private key and a public key.
The private key is located on the client machine and is secured and kept secret.
The public key can be given to anyone or placed on any server you wish to access.
When you attempt to connect using a key-pair, the server will use the public key to create a message for the client computer that can only be read with the private key.
The client computer then sends the appropriate response back to the server and the server will know that the client is legitimate.
This entire process is done in the background automatically after you set up keys.

How To Create SSH Keys

SSH keys should be generated on the computer you wish to log in from. This is usually your local computer.
Enter the following into the command line:
  • ssh-keygen -t rsa
Press enter to accept the defaults. Your keys will be created at ~/.ssh/id_rsa.pub and ~/.ssh/id_rsa.
Change into the .ssh directory by typing:
  • cd ~/.ssh
Look at the permissions of the files:
  • ls -l
Output
-rw-r--r-- 1 demo demo 807 Sep 9 22:15 authorized_keys -rw------- 1 demo demo 1679 Sep 9 23:13 id_rsa -rw-r--r-- 1 demo demo 396 Sep 9 23:13 id_rsa.pub
As you can see, the id_rsa file is readable and writable only to the owner. This is how it should be to keep it secret.
The id_rsa.pub file, however, can be shared and has permissions appropriate for this activity.

How To Transfer Your Public Key to the Server

You can copy the public key to the remote server by issuing this command:
  • ssh-copy-id remote_host
This will start an SSH session, which you will need to authenticate with your password.
After you enter your password, it will copy your public key to the server's authorized keys file, which will allow you to log in without the password next time.

Client-Side Options

There are a number of optional flags that you can select when connecting through SSH.
Some of these may be necessary to match the settings in the remote host's sshd configuration.
For instance, you if you changed the port number in your sshd configuration, you will need to match that port on the client-side by typing:
  • ssh -p port_number remote_host
If you only wish to execute a single command on a remote system, you can specify it after the host like so:
  • ssh remote_host command_to_run
You will connect to the remote machine, authenticate, and the command will be executed.
As we said before, if X11 forwarding is enabled on both computers, you can access that functionality by typing:
  • ssh -X remote_host
Providing you have the appropriate tools on your computer, GUI programs that you use on the remote system will now open their window on your local system.

Conclusion

Learning your way around SSH is a worthwhile pursuit, if only because it is such a common activity.
As you utilize the various options, you will discover more advanced functionality that can make your life easier. SSH has remained popular because it is secure, light-weight, and useful in diverse situations.

Monday, October 9, 2017

Repositories of Ubuntu

What are Repositories?

There are literally thousands of Ubuntu programs available to meet the needs of Ubuntu users. Many of these programs are stored in software archives commonly referred to as repositories. Repositories make it easy to install new software, while also providing a high level of security, since the software is thoroughly tested and built specifically for each version of Ubuntu.
Ubuntu distinguishes between software that is "free" and software that is not free. For details of Ubuntu's Free Software Philosophy please see here.
The four main repositories are:
  • Main - Canonical-supported free and open-source software.
  • Universe - Community-maintained free and open-source software.
  • Restricted - Proprietary drivers for devices.
  • Multiverse - Software restricted by copyright or legal issues.
The Ubuntu Install CDs contain software from the "Main" and "Restricted" repositories, so if you have no internet connection you can still install software from the CDs. If you have an internet connection you can install software from any Ubuntu repository.
This page describes how to manage software repositories in Ubuntu. For Kubuntu please see Kubuntu repository management.
GUI-based repository management is normally accomplished via "Software Sources". This interface can be accessed via several methods. One method is to go through the "Ubuntu Software Center". Open the software center, then from the Edit menu select "Software Sources". Note: You will have to enter your password to change settings in this window.
You can download a copy of a Canonical repository for your machine architecture (for example, i386) and use it offline (see AptGet/Offline/Repository).
IconsPage/info.png The operations described on this page modify the software repositories configuration file /etc/apt/sources.list. If you wish to, you can modify this file directly. For further details please see Managing Repositories from the Command Line.

Ubuntu Software Tab

Software Sources.png

The Four Main Repositories

The "Ubuntu Software" tab displays a list of repositories or "Channels". The four main repositories are:
  • Main - Canonical-supported free and open-source software.
  • Universe - Community-maintained free and open-source software.
  • Restricted - Proprietary drivers for devices.
  • Multiverse - Software restricted by copyright or legal issues.
For a detailed description of these repositories, see Repositories.
To disable a repository temporarily, untick the checkbox next to its name.
Select "Close" to save your changes. A dialog box should appear, asking whether you'd like to update the list of repositories. Select "Reload" to update the list.
  • Repobuttons.png
The Close, Reload, and Revert buttons each perform special functions with regard to the repository pages.
  • Close. The 'Close' button must be selected to execute any change(s). If the action would change system files, they are written at this time.
  • Reload. Any time a setting is changed which alters a repository setting the 'Reload' button should be selected to allow the applicable repository database to be updated. Repository information will not normally be updated until the 'Reload' button is selected. If you do not wish to use 'Reload', select 'Close' to exit without updating the database.
  • Revert. The 'Revert' button erases changes made since the last save. It merely cancels pending changes which have not been executed, returning the selections to their prior state. The button does not return system files to the original installation settings.

Download Server

Copies of the main repositories are available on different servers round the world. The fastest server for you will often be a server close geographically to you.
If you have problems with your current server (for example, the server is slow or you cannot find a package you expect) then select another server by clicking the "Download from:" list.
If you click "Select Best Server", Ubuntu will attempt (on this occasion only) to find the fastest server. Once you select a server it remains the selected server until you change it. Note: The fastest server now may not be the fastest server at another time.

CD-ROM/DVD

The option to install from CD-ROM may be selected or deselected from this window (in the section "Installable from CD-ROM/DVD").
Software Sources.png
If the option is selected, the system will attempt to search the CD-ROM during package installs. If the CD-ROM is not present, the system will request its insertion.
Deselect this option if you do not plan to install packages from CD-ROM. Once the option is deselected the system will no longer check if a CD-ROM is present.

Other Software Tab

Enabling Canonical Partner Repositories

The "Other Software" tab is where you can enable Canonical Partner Repositories. The partner repositories offer access to proprietary and closed-source software and are disabled by default. If you wish to enable a partner repository, tick it, enter your password, click "Close", and then click "Reload".
In the screenshot below two partner repositories are listed - one for applications (enabled) and one for source code (disabled).
Other Software tab_001.png

CD-ROM/DVD

You can add software sources on CD-ROM/DVD using this tab. To add such a source, insert the CD-ROM/DVD and click the "Add Volume" button. Once you have added the CD-ROM/DVD, it will be searched for packages during installation requests.

Adding Personal Package Archives (PPAs)

Personal Package Archives (PPAs) are a kind of repository. Developers create them in order to distribute their software. In order to add a PPA you need its "location", which is in the format ppa:[username]/[ppaname]. You can find this information on the PPA's Launchpad page.
IconsPage/warning.png Packages in PPAs do not undergo the same process of validation as packages in the main repositories. PPAs are a low-security alternative to the main repositories, so the user will be installing software at their own risk.
To add a PPA to your system's software sources:
  • Navigate to Ubuntu Software Centre > Edit > Software Sources > Other Software.
    Other Software tab_001.png
  • Click Add.
    Add-PPA.png
  • Enter the PPA's location (as described above).
  • Click Add Source.
    Authenticate_001.png
  • Enter your password.
  • Click Authenticate.
  • Click Close.
  • If you are asked if you want to reload the information about available software, click Reload.
You have now added the PPA and can install packages from it.

Adding a PPA using the command-line

Make sure you have the package python-software-properties installed.
Step 1: On the PPA's Launchpad page, look for the heading that reads "Adding this PPA to your system". Make a note of the PPA's location, which has the format ppa:user/ppa-name.
Step 2: Open a terminal and enter:
sudo add-apt-repository ppa:user/ppa-name
Replace 'ppa:user/ppa-name' with the PPA's location that you noted above.
Your system will now fetch the PPA's key. This enables your system to verify that the packages in the PPA have not been interfered with since they were built.
Step 3: Now, as a one-off, tell your system to pull down the latest list of software from each archive it knows about, including the PPA you just added:
sudo apt-get update
Now you're ready to start installing software from the PPA!

Adding Extra Repositories

There are times when you might want to add extra repositories to your system's software sources (that is, in addition to the repositories provided by Canonical). For example, there is at least one repository that "caters to the Ubuntu gamer".
IconsPage/warning.png Make sure that any repositories that you add have been tested and are known to work on Ubuntu systems. Repositories that are not designed to work with your version of Ubuntu can introduce inconsistencies in your system and might force you to re-install.
In order to add a repository you need its "location" and the "key command" (the command that will add the repository's key to your system). For an explanation of the format of the "location", see the Editing Repository Details section below.
To add a repository to your system's software sources:
  • Navigate to Ubuntu Software Centre > Edit > Software Sources > Other Software.
    Other Software tab_001.png
  • Click Add.
    Add-PPA.png
  • Enter the repository's location.
  • Click Add Source.
    Authenticate_001.png
  • Enter your password.
  • Click Authenticate.
  • Click Close.
  • If you are asked if you want to reload the information about available software, click Reload.
  • In a terminal enter the "key command".
You have now added the repository and can install packages from it.

Editing Repository Details

To edit a repository's details, select the repository in the list and click the Edit button. A dialog box displays the apt line, broken up into its components.
SoftwareSources-EditSource.png
The fields are as follows:
  • Type designated as "binary" (deb) for software in binary format or "Source" (src) for source code format. Select the option that corresponds to the repository.
  • URI Enter a valid Uniform Resource Indicator or URI for the software repository. Here's a list of examples:
    • cdrom
      cdrom:[description_of_cd]/ 
    • ftp
      ftp://ftp.domain.ext/path/to/repository 
    • http
      http://www.domain.ext/path/to/repository 
    • smb (works only when the computer is connected to a Samba share)
      smb://path/to/repository   
    • nfs (works only if the computer is connected to a NFS share)
      file://path/to/local/directory   
  • Distribution
    Select the name of the distribution or the name of the distribution version.
  • Components
    Select the repository section to access. Add more sections separated by spaces.
  • Comment
    Add a comment to describe the repository for easier reference.

Removing & Disabling Repositories

The "Other Software" tab lists your repositories and PPAs (except for Main, Universe, Restricted, and Multiverse).
To disable a repository temporarily, untick the checkbox next to the source. You can enable the repository again by re-ticking the checkbox.
To remove a repository permanently from the list, highlight the repository and click "Remove".

Updates Tab

SoftwareSources-Updates.png
The Updates tab is where you set when and how Ubuntu receives system updates. If you make any changes don't forget to "Close" and "Reload" so that your system's software sources will be updated.

Install updates from:

  • "Important security updates (...)". Updates that fix security vulnerabilities. They are managed by the Ubuntu Security Team and are designed to change the behavior of the package as little as possible -- in fact, the minimum required to resolve the security problem. As a result, they tend to be very low-risk to apply and all users are urged to apply security updates.
  • "Recommended updates (...)". Updates for serious bugs other than security vulnerabilities.
  • "Unsupported updates (...)". New versions of packages which have been backported to an older release. Packages may contain new features, may introduce new interfaces, and bugs. Such updates are not supported by Canonical on the release they have been backported to but they have been tested by members of the Ubuntu community. For more information on backports, visit UbuntuBackports

Automatic Updates

This section allows the user to set the frequency and manner of updates.

Notify me of a new Ubuntu version:

Allows users to upgrade to new versions of Ubuntu.
  • "Normal Releases" - Notifies the user of an upgrade from one regular release to another, such as from Ubuntu 12.10 (Quantal Quetzal) to Ubuntu 13.04 (Raring Ringtail).
  • "Long Term Support Releases Only" - Notifies the user of an upgrade between Long Term Support releases, such as from Ubuntu 10.04 (Lucid Lynx) LTS to Ubuntu 12.04 (Precise Pangolin) LTS but not to other distributions which were not designated Long Term Support releases.

Authentication Tab

SoftwareSources-Authentication.png
The Authentication tab lists the keys for your repositories (but not your PPAs). Note: PPAs do have keys but the system handles them automatically and they are not listed here.
When you add a repository to your system's software sources the maintainer of the repository will normally tell you how to add the key.
If the maintainer does not tell you how to add the key then you need to find the "key hash" of the repository in order to look up the key on a public key server. Once you know the key hash, the key can be retrieved using the command:
gpg --keyserver [name of keyserver] --recv-keys [keyhash] 
For example, if the key hash is CE49EC21, you retrieve the key using the command:
gpg --keyserver subkeys.pgp.net --recv-keys CE49EC21 
Then, add the key to Ubuntu's apt trusted keys database using the command:
gpg --export --armor CE49EC21 | sudo apt-key add - 
Note: There's a dash at the end of the line above.
IconsPage/info.png For more on apt and authentication keys, see SecureApt.

Integration with Ubuntu Software Center

UbuntuSoftwareCenter.png
Ubuntu Software Center is the GUI-based method to add or remove applications. It allows the user to selectively choose the repositories to be searched and then presents a list of applications with a brief description of each application.
By default Ubuntu Software Center searches all (enabled) repositories. If you wish to search one repository only then click the down arrow to the right of All Software and select the repository that you wish to search.
Software Sources is accessible from the Ubuntu Software Center via the Edit, Software Sources menu. The contents of Ubuntu Software Center are updated whenever a repository is added, deleted or changed via Software Sources. While the repository list is updating the Progress icon is displayed in the top bar of Ubuntu Software Center.

Exploring the Repositories

There are several GUI-based methods you can use to explore the repositories. One is to open Synaptic Package Manager and click on the Origin button. This will display a repository list in the window above the button. The list will contain all the repositories enabled in your system's software sources. To the right will be the packages available via download (white boxes) and currently installed packages (green boxes).
There are two cropped images of the main Synaptic window below:
  • The image on the left shows the results of selecting Local/main (packages from the Main repository stored locally). Local packages are packages stored on the user's computer.
  • The image on the right displays the results of selecting archive.ubuntu.com/main (the Main repository).
softwaresources.packages1.png

Finding a Package's Repository

It is sometimes useful to find a package's repository (the repository that the package was installed from). If you highlight the package and click the Properties button you may be able to determine the repository in the Section: area. The name in parentheses (if any) is the repository. For example, from the screenshot below we can see that the rar package's repository is Multiverse.
properties.png
Another method to find a package's repository is to visit http://packages.ubuntu.com/. The search box is an easy method to quickly locate a package maintained by the Ubuntu team. Several input selections are available to help the user refine the search.
(Note: Some packages are not available from a repository or PPA, instead they are available as Debian packages.)

Wednesday, October 4, 2017

HowTo: Move A Folder In Linux Using mv Command

How do I move a folder in BSD/Linux/Apple OX or Unix operating system using bash command line option?

You need to use the mv command to move folder, files, and directories in Linux terminal. The syntax is as follows:

mv source target
mv folder1 folder2 target
mv folder1 file1 target
mv -option source target

The following example would move a folder named documents, without changing its name, from the current directory to an existing subdirectory of the current directory named /backups:
mv documents /backups
mv command can be used to move any number of files and folders in a single command. In this example, the following command moves all folders, including all the contents of those directories, from the current directory to the directory called /nas03/users/home/v/vivek
mv * /nas03/users/home/v/vivek
Please note that the asterisk is a wildcard character that represents all files and folders the current directory. In this next example, move only foo and bar folders from the /home/tom directory to the directory called /home/jerry:
mv /home/tom/foo /home/tom/bar /home/jerry
OR
cd /home/tom
mv foo bar /home/jerry
mv can see explain what is being done with the -v option i.e. it shows the name of each file before moving it:
mv -v /home/tom/foo /home/tom/bar /home/jerry
Sample outputs:
`/home/tom/foo/' -> `/home/jerry/foo'
`/home/tom/bar/' -> `/home/jerry/bar'
You can prompt before overwrite i.e. pass the -i option to make mv interactive if the same name files/folder already exists in the destination directory:
mv -i foo /tmp
Sample outputs:
mv: overwrite `/tmp/foo'? 

Other options

Taken from the man page of gnu/mv command:

What is the correct way to completely remove an application?

  • apt-get remove packagename
    will remove the binaries, but not the configuration or data files of the package packagename. It will also leave dependencies installed with it on installation time untouched.
  • apt-get purge packagename or apt-get remove --purge packagename
    will remove about everything regarding the package packagename, but not the dependencies installed with it on installation. Both commands are equivalent.
    Particularly useful when you want to 'start all over' with an application because you messed up the configuration. However, it does not remove configuration or data files residing in users home directories, usually in hidden folders there. There is no easy way to get those removed as well.
  • apt-get autoremove
    removes orphaned packages, i.e. installed packages that used to be installed as an dependency, but aren't any longer. Use this after removing a package which had installed dependencies you're no longer interested in.
  • aptitude remove packagename or aptitude purge packagename (likewise)
    will also attempt to remove other packages which were required by packagename on but are not required by any remaining packages. Note that aptitude only remembers dependency information for packages that it has installed.
And many more exist. Lower-level dpkg-commands can be used (advanced), or GUI tools like Muon, Synaptic, Software Center, etc. There's no single 'correct way' of removing applications or performing other tasks interacting with your package management.
The list you found are just examples. Make sure you understand the meanings and try out what it wants to do before accepting the action (you need to press Y before it actually performs the actions as proposed).
The asterisk version in the question is probably wrong; apt-get accepts a regular expression and not a cầu pattern as the shell. So what happens with
sudo apt-get remove application*
is the following:
  1. The shell tries to expand application* looking at the files in the current directory. If (as is normally the case) it finds nothing, it returns the glob pattern unaltered (supposing bash with default behavior here --- zsh will error out).
  2. apt-get will remove the packages whose name contains a string that satisfies the regular expression application*, that is, applicatio followed by an arbitrary number of n: applicatio, application, applicationn, libapplicatio, etc.
  3. To see how this can be dangerous, try (without root for double safety) apt-get -s remove "wine*" (-s will simulate the thing instead of doing it) --- it will say is going to remove all packages that has "win" in their name and the dependant, almost the entire system...
Probably, the command that was meant is really
 sudo apt-get remove "^application.*"
(note the quotes and the dot) which will remove all packages whose name starts with application.
These commands,
sudo updatedb                  # <-- updates the locate database (index). harmless
sudo locate application        # <-- locates the file 'application'. harmless
sudo rm -rf (file/folder name) # <-- removes files/dirs recursively. dangerous.
are completely outside the scope of the package management. Do not remove files belonging to packages without using the package manager! It will get confused and is the wrong way to do things.
If you don't know to which package a file belongs, try this:
dpkg -S /path/to/file

List all file and foler linux

ls -Rla /

Tuesday, October 3, 2017

Editing files with vi

The thing you have to understand about vi and its work-alike editors is modality. Most programs have just one mode, accepting input and placing it at the cursor. This is what you probably expect from a program. But vi has other modes. When you start vi, you’ll be in “Normal” mode, which is really command mode. When you are in Normal mode, whatever you type is considered not to be input, but commands that vi will try to execute.
This may sound a little crazy, but it is actually a very powerful way to edit documents. Even if you hate it, the ubiquity of vi means that you’re going to need to learn the basics, because sometimes you just have to use it. On the other hand, if you enjoy working at a command line, then you may end up loving vi.

Lesson 1: How to Quit vi

Since vi is the default editor, there’s a good chance you got dropped into it without knowing it. This can be extremely frustrating if you don’t know your way around the program.
To exit vi without saving changes, hit Escape a couple of times to ensure you are in Normal mode, and then type:
:q!

Lesson 2: Editing with vi

Start vi and press i. The cursor may change shape, and INSERT is displayed at the bottom of the screen (in most vi clones). You are now in insert mode — all your keystrokes are entered into the current buffer and are displayed to the screen.
Hit the Escape key. The cursor changes shape again, and INSERT has disappeared. You are back in Normal mode. Hitting Escape a few times will pretty much always cancel whatever you are doing and return you to Normal mode.
Command mode is also where you move around in the file. On most systems, you can use the arrow keys to move the cursor. If that fails, cursor movement can be accomplished with the hjkl keys:
h   move left one character
j   move down one character
k   move up one character
l   move right one character
vi has its own command line, which you access by typing a colon. Commands typed at the command line will not be executed until you hit Enter, just like in the shell.
Many of the commands that you will use in command mode begin with a colon. For example, the command to quit is :q, as we learned in Lesson 1 above. Actually, in Lesson 1 we added !, which tells vi to “force” the operation. If you have edited the file, typing :q will not immediately exit the program, but instead produce this error message:
E37: No write since last change (add ! to override)
To save your changes, use the :w command (“Write”). You can save and quit all in one go by typing both commands together:
:wq
Of course, if you started vi without giving a file name, you’ll need to provide one. For example, to save your working file as test.txt, you would type:
:w test.txt
Try editing some text now.
  • Start vi
  • Hit i to go to Insert mode.
  • Type some text.
  • Hit Escape to return to Normal mode.
  • Type :w test.txt to save your work
  • Type :q to quit

vi Quick Reference

Movement

h, j, k, l
left, down, up, right
$
To the end of the line
^
To the beginning of the line
G
To the end of the file
:1
To the beginning of the file
:47
To line 47

Editing

dd
Remove a line
5dd
Removing five lines
r
Replace a character
x
Delete a character
5x
Delete 5 characters
u
Undo last action
J
Join current and next lines (Note the capital — hold the Shift key)

Saving and Quitting

:q
Quit
:q!
Quit without saving
:wq
Write and quit
:w
Write (without quitting)
:e!
Reload currently open file from disk
:w test.txt
Write buffer to file test.txt
:e test2.txt
Open file test2.txt